
This tutorial shows you how to use OpenAI's ChatGPT to create a bot that can move around your map and chat with your players.
The bot will be able to:
- move around the map
- welcome a visitor when they enter the map
- answer questions using the chat
- guide the visitors to real flesh-and-bone humans
Through this tutorial, we want to demonstrate how WorkAdventure can be a perfect match for AI-based chat-bots. We take OpenAI's ChatGPT as an example, but the idea would be the same for any other LLM based chat-bot.
The WorkAdventure team is dying to see what a true AI developer can do with this technology.
In this tutorial we assume that you have a basic understanding of how to build a map in WorkAdventure with Tiled, that you have a basic understanding of the WorkAdventure scripting API, and that you have a basic understanding of the OpenAPI completion API.
You can refer to the final implementation here.
Preparation
You will first need an API key for OpenAI's ChatGPT. If you haven't got one yet, you can create an account here.
You will then need a map where your bot will live. In this tutorial, we are using the WorkAdventure Starter-Kit map. If you create a map, please make sure to start from this stater kit. It will make your life easier as it contains a working Typescript script.
Our battle plan
Our bot will be executed in a dedicated browser tab. When we are happy with our bot, we will be able to deploy it in a container that runs it in a headless Chromium browser (this part is not covered in this tutorial).

The bot is coded using the WorkAdventure scripting API. It will:
- analyze the map to find the rooms/spaces
- turn those rooms/spaces into a textual description that can be processed by the LLM
- react to players entering a room/space
- detect when a player is entering a bubble with the bot
- start chatting with the player
Because the bot connects to WorkAdventure as a regular user, it will be seen by other users as a regular user (!) If your bot is clever enough, he could actually masquerade as a human being 🤯
On the map (using Tiled)
We will define zones on the map that will be used for the textual description of the map to the bot. This notion of zones with descriptions does not exist by default in WorkAdventure. But that's not a big problem. We will create those using Tiled.
In Tiled, select the "floorLayer". This layer is a layer of type "Object Layer". We can add "areas" to this layer.
An area is a special rectangle that has the type (or class) area.
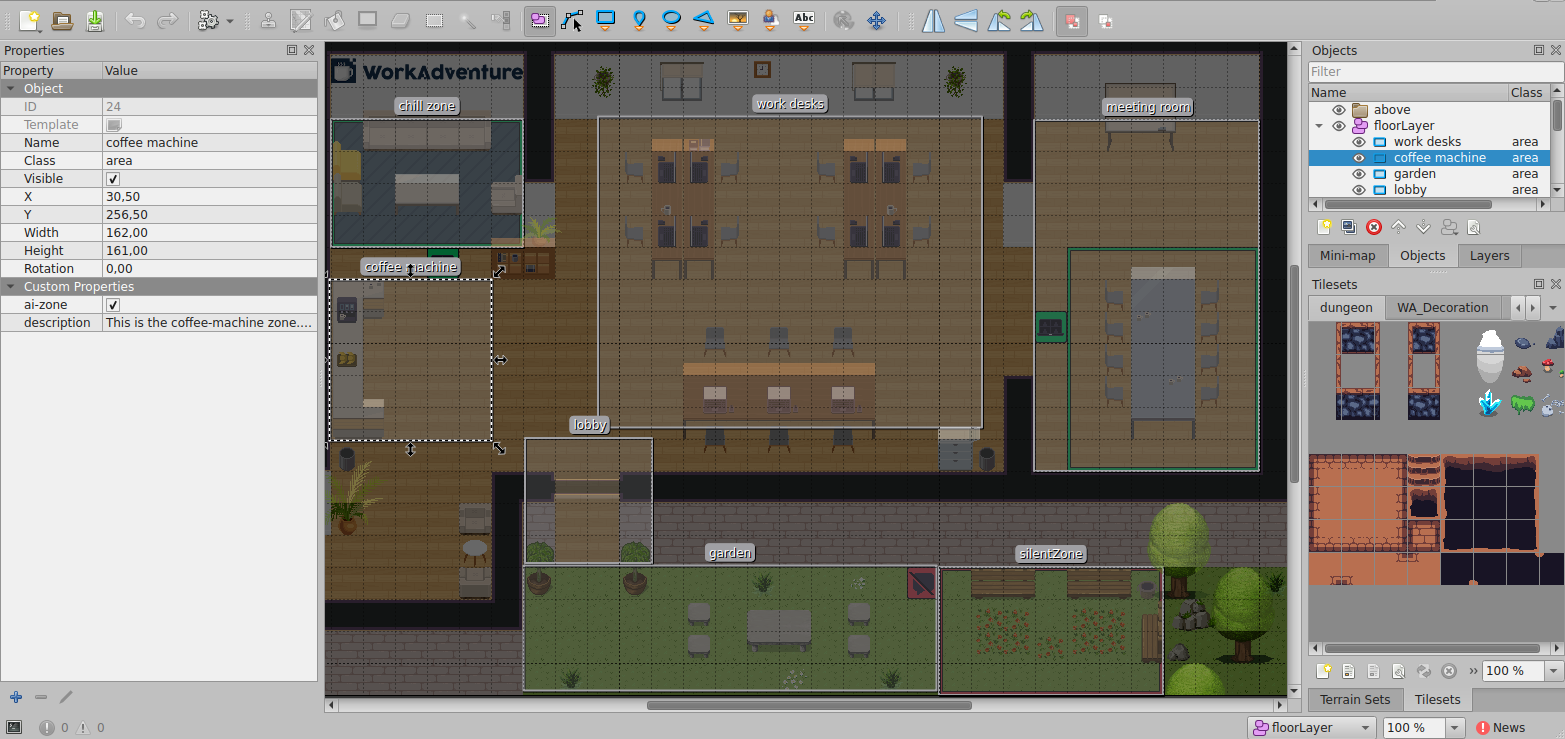
In the screenshot above, you can see that we have created many areas (chill zone, work desks, coffee machine...).
In order to make those areas different from regular WorkAdventure areas, we have added two custom properties:
ai-zone: a boolean property that is set totruefor all the areas that we want to be processed by the botdescription: this is the textual description of the area that will be sent to the bot
The code
I chose to design this bot with 2 different modes:
- A "moving" mode where the bot is listening for players entering special areas. When a player enters an area, the bot will run a prompt to ask ChatGPT where to move next.
- A "chatting" mode where the bot is listening for players entering a bubble with the bot. When a player enters the bubble, the bot will start chatting with the player.
There are therefore 2 different prompts, generated dynamically.
The "moving" mode
Let's first generate a prompt to ask ChatGPT where to move next.
My ideal prompt would be something like:
You are a bot living in a WorkAdventure map.
Your job is to welcome visitors. In priority, you should welcome visitors entering the lobby.

In your map, you can find the following places:

- chill zone: People in this zone are relaxing.
- meeting room: This is a meeting room where people gather that have meetings.
- lobby: This is the entrance of the office. People entering this place should be welcome in priority.
- ...

In your map, you can find the following people:

- Max is in lobby
- David is in meeting room

Max is a visitor.
David is a coworker.

Please tell me who you are going to greet.
You should answer in the format "Go to <name>" where <name> is the name of the person you are greeting.
Please answer only this and nothing else.
See what I did? I'm telling the AI to decide who to visit depending on the description of the places and people in the map.
In order to be able to generate this, I must be able to:
- list all the areas that are marked as
ai-zonein the map - list all the players that are present in the map
Let's start with the areas.
Listing the areas
In order to list the areas, we will access the JSON representation of the map (remember, TMJ maps in Tiled are stored in
JSON format). This JSON representation is available using the WA.room.getTiledMap() function.
Reading all the layers of a Tiled map can be tedious, because the layers are nested in groups. In order to simplify this,
the scripting-api-extra library provides a function that will flatten the layers of a Tiled map. This function is called
getLayersMap(). The scripting-api-extra library is already part of the WorkAdventure Starter Kit, so you don't need
to install it.
From the list of layers, we will need to filter on all layers of type "object". Then, we can scan all the objects of those
layers and filter on the objects that have a type set to area and the ai-zone property set to true.
import {getLayersMap, Properties} from "@workadventure/scripting-api-extra/dist";

let placesPromise: Promise<Map<string, string|undefined>>|undefined;

export async function findPlaces(): Promise<Map<string, string|undefined>> {
  // We cache the result of this function in `placesPromise` so that we don't have to recompute it every time.
  if (placesPromise !== undefined) {
    return placesPromise;
  }

  return new Promise(async (resolve) => {
    // Key: the name of the area, description: the description of the area
    const zones = new Map<string, string|undefined>();

    // Get the flattened layers of the map
    const layers = await getLayersMap();
    for (const layer of layers.values()) {
      // Filter on layers of type "objectgroup"
      if (layer.type === 'objectgroup') {
        // Scan all the objects of the layer
        for (const object of layer.objects) {
          // Filter on objects of type "area" that have the "ai-zone" property set to true
          // Note: in Tiled 1.8 (only), the "type" property is called "class"
          if (object.type === 'area' || object.class === 'area') {
            // The Properties class from the scripting-api-extra is a helper class that makes it easier to access the custom properties
            const properties = new Properties(object.properties);
            if (properties.getBoolean('ai-zone') === true) {
              zones.set(object.name, properties.getString('description'));
            }
          }
        }
      }
    }

    resolve(zones);
  });
}
Now that we have a function that returns a map of all the areas, we can use it to generate the prompt.
export async function generatePlacesPrompt(): Promise<string> {
  const zones = await findPlaces();

  let prompt = "In your map, you can find the following places:\n\n";

  for (const [name, description] of zones.entries()) {
    prompt += `- ${name}: ${description}\n`;
  }

  return prompt;
}
A call to generatePlacesPrompt() will return a string like:
In your map, you can find the following places:

- chill zone: People in this zone are relaxing.
- meeting room: This is a meeting room where people gather that have meetings.
- ...
Good! Now, let's do the same for the people.
Listing the people by role
Listing the people happens to be easier. We need to access the list of players that are currently in the map.
This can be done using the WA.players.list() function.
Before calling this function, we need to tell WorkAdventure to synchronize the list of players with our script. This is not done by default, because it can be a costly operation. But in our case, we need it.
await WA.players.configureTracking({
  players: true,
  movement: false,
});
Now, we can call WA.players.list() to get the list of players.
Good! But... how can I tell if a player is a visitor or a coworker?
WorkAdventure has a property called WA.player.tags that list all the tags of a player. In the SAAS version of
WorkAdventure, all members have a "member" tag by default. By opposition, visitors don't have any tag.
So we can use the WA.player.tags to tell if a player is a visitor or a coworker.
However, this only works locally. WorkAdventure does not allow (by default) to access the tags of other players. So we will have to expose this information to our bot.
To do so, we will be using the "player variables" feature of WorkAdventure. This feature allows you to store information about a player in a key/value store. This key/value store can be made accessible to all the players (including the bot).
In order to store the tags of a player in the player variables, we will use the WA.player.state.saveVariable method.
On startup, we will simply run:
await WA.player.state.saveVariable('tags', WA.player.tags, {
  persist: false,
  public: true,
});
The public option tells WorkAdventure to make this variable accessible to all the players. The persist option is
set to false: we don't want to persist this information across sessions, since it will be recomputed on each startup.
Now, we can scan all users, look at their tags, and sort them in 2 categories: visitors and coworkers.
export function findPeopleByRole(): {
  "visitors": Array<RemotePlayerInterface>,
  "coworkers": Array<RemotePlayerInterface>,
} {
  const players = WA.players.list();

  const visitors = new Array<RemotePlayerInterface>();
  const coworkers = new Array<RemotePlayerInterface>();

  for (const player of players) {
    if (isTeamMember(player)) {
      coworkers.push(player);
    } else {
      visitors.push(player);
    }
  }

  return {
    visitors,
    coworkers,
  }
}

function isTeamMember(player: RemotePlayerInterface): boolean {
  return ((player.state.tags ?? []) as string[]).includes("member");
}
In the isTeamMember, we are casting player.state.tags to a string array. In practice, a hacker could put any
value in this field (because it is controlled by the remote user). So a more robust implementation would be to
check that the value is indeed an array of strings, for instance by validating the value using the Zod library.
We can now generate the prompt for the people:
export function generatePeopleByRolePrompt(): string {
  const peopleByRole = findPeopleByRole();

  const formatter = new Intl.ListFormat('en', { style: 'long', type: 'conjunction' });

  const coworkers = peopleByRole['coworkers'];
  const visitors = peopleByRole['visitors'];

  let prompt = '';

  if (coworkers.length === 0) {
    prompt = "No one from your team is in this map.\n";
  } else if (coworkers.length === 1) {
    prompt = `${coworkers[0].name} is a coworker. He/she is part of your team.\n`;
  } else {
    prompt = `${formatter.format(peopleByRole['coworkers'].map(person => person.name))} are coworkers. They are part of your team and work in this map.\n`;
  }

  if (visitors.length === 0) {
    prompt = "There are no visitors in this map.\n";
  } else if (visitors.length === 1) {
    prompt = `${visitors[0].name} is a visitor.\n`;
  } else {
    prompt = `${formatter.format(peopleByRole['visitors'].map(person => person.name))} are visitors.\n`;
  }

  return prompt;
}
A quick explanation of the code:
- We use the
Intl.ListFormatclass to generate a list from the list of names. It will concatenate all the names of all users and it will correctly append an "and" at the end. This class is part of the Javascript standard library. - We use the
findPeopleByRole()function that we defined earlier to get the list of people. - Then we generate the prompt, by making a distinction between empty lists, lists with a single element, and lists with multiple elements.
The prompt generated by this function will look like:
David is a coworker. He/she is part of your team.
Max, John and Rose are visitors.
Listing the people by place
We will enhance our description of the scene by also stating where the people are.
In order to do so, we will use a similar approach as the one we used to list the people by role.
Each player will keep track of its location. When a player enters a new area, we will set a special currentPlace variable
to the name of the area the user is in.
export async function updateMyPlace(): Promise<void> {
  const places = await findPlaces();
  for (const areaName of places.keys()) {
    WA.room.area.onEnter(areaName).subscribe(() => {
      WA.player.state.saveVariable('currentPlace', areaName, {
        persist: false,
        public: true,
      });
    });
  }
}
A quick explanation of the code:
- We use the
findPlaces()function that we defined earlier to get the list of areas. - Then, we use the
WA.room.area.onEntermethod to subscribe to theenterevent of each area. This event is triggered when a player enters an area. - When the event is triggered, we use the
WA.player.state.saveVariablemethod to save the name of the area in thecurrentPlacevariable.
This is done by each player entering the map.
Now, we can generate the prompt describing people and their location:
export function generatePeopleByPlacesPrompt(): string {
  const peopleByPlace = findPeopleByPlace();

  let prompt = "In your map, you can find the following people:\n\n";

  const formatter = new Intl.ListFormat('en', { style: 'long', type: 'conjunction' });

  for (const [place, people] of peopleByPlace.entries()) {
    prompt += `- ${formatter.format(people.map(person => person.name))} ${people.length === 1 ? "is" : "are"} in ${place}\n`;
  }

  return prompt;
}
This will generate a prompt like:
In your map, you can find the following people:

- Max is in lobby
- David is in meeting room
- ...
Putting the prompt together
Our prompt is almost ready. All we have to do is to put all the pieces together.
export async function getMovePrompt(): Promise<string> {
  return `You are a bot living in a WorkAdventure map.
Your job is to welcome visitors. In priority, you should welcome visitors entering the lobby.

${await generatePlacesPrompt()}
${generatePeopleByPlacesPrompt()}
${generatePeopleByRolePrompt()}

Please tell me who you are going to greet.
You should answer in the format "Go to <name>" where <name> is the name of the person you are greeting.
Please answer only this and nothing else.
    `;
}
Good, we have a prompt that we can send to ChatGPT. But first, we need to decide when to send it.
Deciding if the current user is the bot or not
The prompt generation should only be triggered in the browser of the "bot".
We need to detect when the player is the bot. There are many ways to do this.
- We could use the
WA.player.nameproperty. If the name of the player is "Robot", then we know that we are the bot. - We could use the player tags. A special "bot" tag could be added to the bot player.
- We could use special parameters in the URL. For instance, we could add a
#bot=truehash parameter to the URL of the map.
We will use the last option. We will add a #bot=true parameter to the URL of the map on the bot side.
We can do so by checking the WA.room.hashParameters that exposes the hash as an object.
if (WA.room.hashParameters.bot) {
  robot.init();
}
(the robot.init() function is not defined yet, but we will define it later)
Triggering the prompt generation
Now, we need to trigger the prompt generation. We can ask chat GPT to generate a prompt each time a player
moves from one area to the other.
We can track this by listening to changes in the currentPlace variable.
class Robot {
  private mode: "waiting" | "chatting" = "waiting";

  init() {
    console.log("Robot is starting...");

    WA.players.onVariableChange('currentPlace').subscribe(async () => {
      if (this.mode === "waiting") {
        this.moveRobot();
      }
    });
  }
}
We now need to implement the moveRobot() function. This function will call the OpenAI API and react to the response.
Calling the OpenAI API
In order to call the OpenAI API, we will use the official NodeJS library:
npm install openai
Then, we can import this in our script:
const openai = new OpenAI({
  dangerouslyAllowBrowser: true,
  apiKey: 'xx-xxxxxxxxxxxxxxxxxxxxxxxxxxxxxx',
});
But WAIT! We are using the dangerouslyAllowBrowser option. This is because the OpenAI library is not designed to run
in a browser. It is designed to run in NodeJS. But we are running our bot in a browser.
First thing first, we need to make sure that your OpenAI api key is safe. Don't put it in the Typescript code as all the users of the map share the same code. If you do, you are exposing your OpenAI API key to the world.
Instead, we will use again the WA.room.hashParameters to store the API key in the URL of the map.
const openai = new OpenAI({
  dangerouslyAllowBrowser: true,
  apiKey: WA.room.hashParameters.openaiApiKey,
});
Now, this is indeed safe, because the URL of the bot is not shared with the users of the map. Instead, it will be stored safely in the container in charge of running the bot in a headless browser.
And a nice side effect is that you can easily test your bot locally, simply by adding #bot=true&openaiApiKey=xxx to the URL of your map.
If you want to prevent hackers from flooding your map with their own openApiKey, you could in addition add a test on the tags of the bot. In practice, it is unlikely that a hacker will be willing to pay an OpenAI subscription just to flood your map with their own API key.
Ok, so we now have the OpenAI client ready. We can call the API.
class Robot {
  async moveRobot() {
    const movePrompt = await getMovePrompt();

    console.log("Sending prompt: ", movePrompt);

    // Let's send the prompt to OpenAI GPT 3.5-turbo model (i.e. ChatGPT)
    const chatCompletion = await openai.chat.completions.create({
      messages: [{role: 'user', content: movePrompt}],
      model: 'gpt-3.5-turbo',
    });

    const response = chatCompletion.choices[0]?.message.content;
    if (response === null) {
      console.error("OpenAI returned no response: ", chatCompletion);
      return;
    }
    console.log("OpenAI response:", response);

    if (response.startsWith("Go to ")) {
      const name = response.substring(6);
      console.log("Going to ", name);
      const players = WA.players.list();
      for (const player of players) {
        if (player.name === name) {
          await WA.player.moveTo(player.position.x, player.position.y);
          break;
        }
      }
    }
  }
}
Here is an explanation of the code:
- We use the
getMovePrompt()function that we defined earlier to generate the prompt. - We send the prompt to the OpenAI API using the
openai.chat.completions.createmethod. - We extract the response from the API.
- If the response starts with "Go to ", we extract the name of the person to go to.
- We scan the list of players to find the player with the matching name.
- We move the bot to the position of the player using the
WA.player.moveTomethod.
This code will fail if 2 users have the same name. A bit of work would be needed to deduplicate the user names. This is beside the scope of this tutorial.
With this code, we have a bot that can move around the map. It will decide who to visit by himself. This is already pretty cool. But the bot is not very useful yet. We need to make it chat with the users.
The "chatting" mode
In order to chat with the users, we will use the same approach as the one we used to move the bot around the map.
We will generate a prompt that will be sent to the OpenAI API. The prompt will be generated dynamically, depending on the state of the map and the context of the conversation.
Unlike the "moving" mode, the "chatting" prompt will keep growing as the conversation goes on. This is because with OpenAI APIs, we need to store the state of the conversation locally.
For this, we will add a new chatHistory property in our "Robot" class:
class Robot {
  // ...

  private chatHistory: Array<
          {role: "system" | "assistant", content: string} |
          {role: "user", player: RemotePlayer, content: string}
  > = [];
}
The type of this property is an array of messages. Each message has a role property that can be either "system", "assistant" or "user".
The "system" role is used for messages that are used to setup the bot. The "assistant" role is used to store messages generated by the bot itself.
Finally, the "user" role is used to store messages generated by the users.
Switching to the "chatting" mode
The bot will automatically switch in the "chatting" mode when a user enters the bubble of the bot.
We can detect that with the WA.player.proximityMeeting.onJoin() function.
class Robot {
  // ...

  init() {
    // ...

    WA.player.proximityMeeting.onJoin().subscribe((users) => {
      // When we join a proximity meeting, we start chatting
      this.mode = "chatting";

      this.startChat(users);
    });
  }
}
The WA.player.proximityMeeting.onJoin() function returns an observable that will be triggered when a user enters the bubble of the bot.
When this happens, we switch the bot to the "chatting" mode and we call the startChat() function. The startChat() function is not defined yet.
We will define it in the next section.
The "chatting" prompt
In order to start the chat, we first need to create a prompt that will be sent to the OpenAI API.
Here is the prototype of the prompt I would like to send:
You are a bot living in a WorkAdventure map.
You are currently chatting with Max. You are engaged in a chat, please keep your answers short and to the point.
In this conversation, you can offer to go to a place or to go to a person. I will now describe the places and people you can find in this map.

In your map, you can find the following places:

- chill zone: People in this zone are relaxing.
- meeting room: This is a meeting room where people gather that have meetings.
- lobby: This is the entrance of the office. People entering this place should be welcome in priority.
- ...

In your map, you can find the following people:

- Max is in lobby
- David is in meeting room

Max is a visitor.
David is a coworker.

If you are talking to a visitor, you can direct them to one of the team members if they are present in the room. If you do so, please direct them to the
person whose skills match the best the visitor's needs.
If no team member is present in the room, you can offer the visitors to come back at office hours (9:00 to 18:00, Paris time, on working days).

Because there are many people in this chat, when someone is talking to you, the message sent will be prefixed by the name of the person talking to you.
When you answer, do not put any prefix.

You start first. Please engage the conversation with a short welcome message.
At this point, you could customize the prompt to your needs. You could for instance add much more details on the personality of the bot, making him/her more extraverted, shy, passionate about a topic, etc.
The prompt is quite long, but it is not that complicated to generate. We will use the same approach as the one we used to generate the "moving" prompt.
export async function getChatPrompt(users: RemotePlayer[]): Promise<string> {
  return `You are a bot living in a WorkAdventure map.
You are currently chatting with ${usersList(users)}. You are engaged in a chat, please keep your answers short and to the point.
In this conversation, you can offer to go to a place or to go to a person. I will now describe the places and people you can find in this map.

${await generatePlacesPrompt()}
${generatePeopleByPlacesPrompt()}
${generatePeopleByRolePrompt()}

If you are talking to a visitor, you can direct them to one of the team members if they are present in the room. If you do so, please direct them to the
person whose skills match the best the visitor's needs.
If no team member is present in the room, you can offer the visitors to come back at office hours (9:00 to 18:00, Paris time, on working days).

Because there are many people in this chat, when someone is talking to you, the message sent will be prefixed by the name of the person talking to you.
When you answer, do not put any prefix.

You start first. Please engage the conversation with a short welcome message.
`;
}

const formatter = new Intl.ListFormat('en', { style: 'long', type: 'conjunction' });

function usersList(users: RemotePlayer[]): string {
  return formatter.format(users.map(user => user.name));
}
Now that we have the prompt, we can start the chat.
The first message will be sent to OpenAI as the "system" user.
We will use a utility function triggerGpt to send all the messages to OpenAI:
class Robot {
    // ...

    private async startChat(users: RemotePlayer[]) {
        // Let's generate the prompt
        const chatPrompt = await getChatPrompt(users);

        this.chatHistory = [{
            role: "system",
            content: chatPrompt,
        }];

        const response = await this.triggerGpt();

        WA.chat.sendChatMessage(response, {
            scope: "bubble",
        });
    }


    private async triggerGpt() {
        // Let's create the list of messages to send to OpenAI
        const messages = this.chatHistory.map(message => {
            return {
                role: message.role,
                content: message.content,
            }
        });

        // Send the messages to OpenAPI GPT 3.5-turbo model (i.e. ChatGPT)
        const chatCompletion = await openai.chat.completions.create({
            messages,
            model: 'gpt-3.5-turbo',
        });

        const response = chatCompletion.choices[0]?.message.content;
        if (response === null || response === undefined) {
            throw new Error("OpenAI returned no response: " + JSON.stringify(chatCompletion))
        }
        console.log("OpenAI response:", response);

        // Let's add the response to the chat history. The response will be sent back to OpenAPI on subsequent calls to triggerGpt()
        this.chatHistory.push({
            role: "assistant",
            content: response,
        });

        return response;
    }
}
The message is sent to the other users using the WA.chat.sendChatMessage method.
By default, this method sends the message only to the local user. The second parameter ({scope: "bubble"}) tells
WorkAdventure to send the message to all the users in the bubble.
Handling the user messages
Now that our bot sent the first message, we must listen to messages sent by the users in the bubble.
Listening to messages is done using the WA.chat.onChatMessage method.
Just like with WA.chat.sendChatMessage method, messages are only listened locally by default, so we need
to pass the {scope: "bubble"} option to listen to messages from all the users in the bubble.
class Robot {
    // ...

    init() {
        // ...

        WA.chat.onChatMessage((message, event) => {
            (async () => {
                if (this.mode !== "chatting") {
                    return;
                }

                if (!event.author) {
                    // We are receiving a message from the local user (i.e. ourselves), let's ignore it.
                    return;
                }

                this.chatHistory.push({
                    role: "user",
                    player: event.author,
                    content: event.author.name + ": " + message,
                });

                const response = await this.triggerGpt();

                WA.chat.sendChatMessage(response, {
                    scope: "bubble",
                });
            })().catch(e => console.error(e));
        }, {
            scope: "bubble",
        });
    }
}
Now, each time a user sends a message, we will add it to the chat history and we will send it to OpenAI.
OpenAPI will respond with a message that we will send back to the users using WA.chat.sendChatMessage.
Hooray! We have a bot that can chat with the users.
Improving user experience
The bot is now able to chat with the users. However, in practice, you will quickly notice that sometimes, the bot answers crazily fast, and sometimes, it is quite slow (10 - 20 seconds).
The user speaking to the bot doesn't have a way to know if the bot is thinking or if it is just not responding. We will add that now.
WorkAdventure has a feature called "typing indicator". This feature allows the scripting API to trigger the typing indicator in the client of the other users, therefore simulating that the bot is currently typing something.
You can trigger the display of this indicator with WA.chat.startTyping(); and remove the indicator with WA.chat.stopTyping();.
We can now rewrite the triggerGpt function to trigger the typing indicator just before we send the request to OpenAPI
and remove the typing indicator when the response is received.
    private async triggerGpt() {
        // Let's create the list of messages to send to OpenAI
        const messages = this.chatHistory.map(message => {
            return {
                role: message.role,
                content: message.content,
            }
        });

        WA.chat.startTyping({
            scope: "bubble",
        });

        // Send the messages to OpenAPI GPT 3.5-turbo model (i.e. ChatGPT)
        const chatCompletion = await openai.chat.completions.create({
            messages,
            model: 'gpt-3.5-turbo',
        });

        const response = chatCompletion.choices[0]?.message.content;
        if (response === null || response === undefined) {
            throw new Error("OpenAI returned no response: " + JSON.stringify(chatCompletion))
        }
        console.log("OpenAI response:", response);

        WA.chat.stopTyping({
            scope: "bubble",
        });

        // Let's add the response to the chat history. The response will be sent back to OpenAPI on subsequent calls to triggerGpt()
        this.chatHistory.push({
            role: "assistant",
            content: response,
        });

        return response;
    }
Handling multiple users
If multiple users are in the bubble, the bot will chat with all of them at the same time. But so far, the bot has no way to know who is talking to him.
We can improve that.
The first part is already done: when the chat starts, we warn the bot that it might talk to many people:
Because there are many people in this chat, when someone is talking to you, the message sent will be prefixed by the name of the person talking to you.
When you answer, do not put any prefix.
Now, we need to implement this prefix in the code.
If can be done quite easily by using the player property from the chatHistory messages:
    private async triggerGpt() {
        // Let's create the list of messages to send to OpenAI
        const messages = this.chatHistory.map(message => {
            return {
                role: message.role,
                content: message.role === "user" ? message.player.name + ": " + message.content : message.content,
            }
        });

        // ...
    }
Going further
We have already accomplished a lot in this tutorial.
The implementation of the code in this tutorial is available on Github.
There are still many things that could be improved.
We definitely should handle multiple replies. What happens if a user sends 2 messages in a row? What happens it 2 users send a message at the same time?
We should also handle gracefully the "end of chat" messages. If a user says "bye", the bot should know how to move out of the conversation.
We could add a "follow me" mode where the bot asks a user to follow it.
We could also add a long term memory to the bot. For instance, we could store the name of the users and the past dialog in a database and reuse those when a user comes back.
We could also have bots talking to each other pretty easily, thanks to the architecture we chose (where a bot is a normal user for WorkAdventure)
We should finally take care of the token limit supported by OpenAPI (4096 tokens fro GPT 3.5 turbo). At some point, we will need to trim the past messages to avoid going over the limit.
This tutorial is really just a starting point.
But I hope it gives you enough information to start building your own bot. We are thrilled to see what you will build with this technology, so don't hesitate to share your creations with us on Twitter/X, on Discord or by opening a PR in the awesome-workadventure repository!