
This tutorial shows you how to use Tock.ai to create a bot that can move around your map and chat with your players. Tock, also known as "The Open Conversation Kit", is an open platform that allows you to create chatbots that can interact with users in a natural way.
If you read the previous tutorial, you already know it is possible to use a Large Language Model like GPT-4 to create a bot that can chat with your players. GPT-4 is extremely powerful, but can sometimes generate unexpected or inappropriate responses. Tock.ai is a different approach. Its natural language processing engine is able to understand the meaning of sentences. The bot will then match the intent of the user with an appropriate (hard coded) response. This is less mind-blowing, but it is also more predictable and more secure, as you control each of the answers of the bot. It also does not require a gazillions of dollars of compute power to run (and since it is open-source, you can host the bot yourself).
Tock is widely used in large companies like SNCF (the french national railways). It is a mature and reliable solution.
The bot will be able to:
- move around the map
- welcome a visitor when they enter the map
- answer questions using the chat
- guide the visitors to real flesh-and-bone humans
Through this tutorial, we want to demonstrate how WorkAdventure can be a perfect match for AI-based chat-bots.
In this tutorial we assume that you have a basic understanding of how to build a map in WorkAdventure with Tiled, that you have a basic understanding of the WorkAdventure scripting API, and that you have a running Tock.ai server.
Our battle plan
Our bot will be executed in a dedicated browser tab. When we are happy with our bot, we will be able to deploy it in a container that runs it in a headless Chromium browser (this part is not covered in this tutorial).

The bot is coded using the WorkAdventure scripting API. It will:
- detect when a player is entering a bubble with the bot
- start chatting with the player
- forward messages to Tock and display the response to the player
Because the bot connects to WorkAdventure as a regular user, it will be seen by other users as a regular user (!)
Preparation
You will then need a map where your bot will live. In this tutorial, we are using the WorkAdventure Starter-Kit map. If you create a map, please make sure to start from this stater kit. It will make your life easier as it contains a working Typescript script.
You will also need a running Tock.ai server. On this server, we need to create a new bot. This bot will be using a connector of type "Web". This connector will expose an HTTP endpoint that we will call from our bot.
Creating / configuring the web connector
Connect to the Tock Studio. In the "Settings" menu, click the "Configurations" tab. From there, you can check if your bot has a "Web" connector. If not, you can create one.
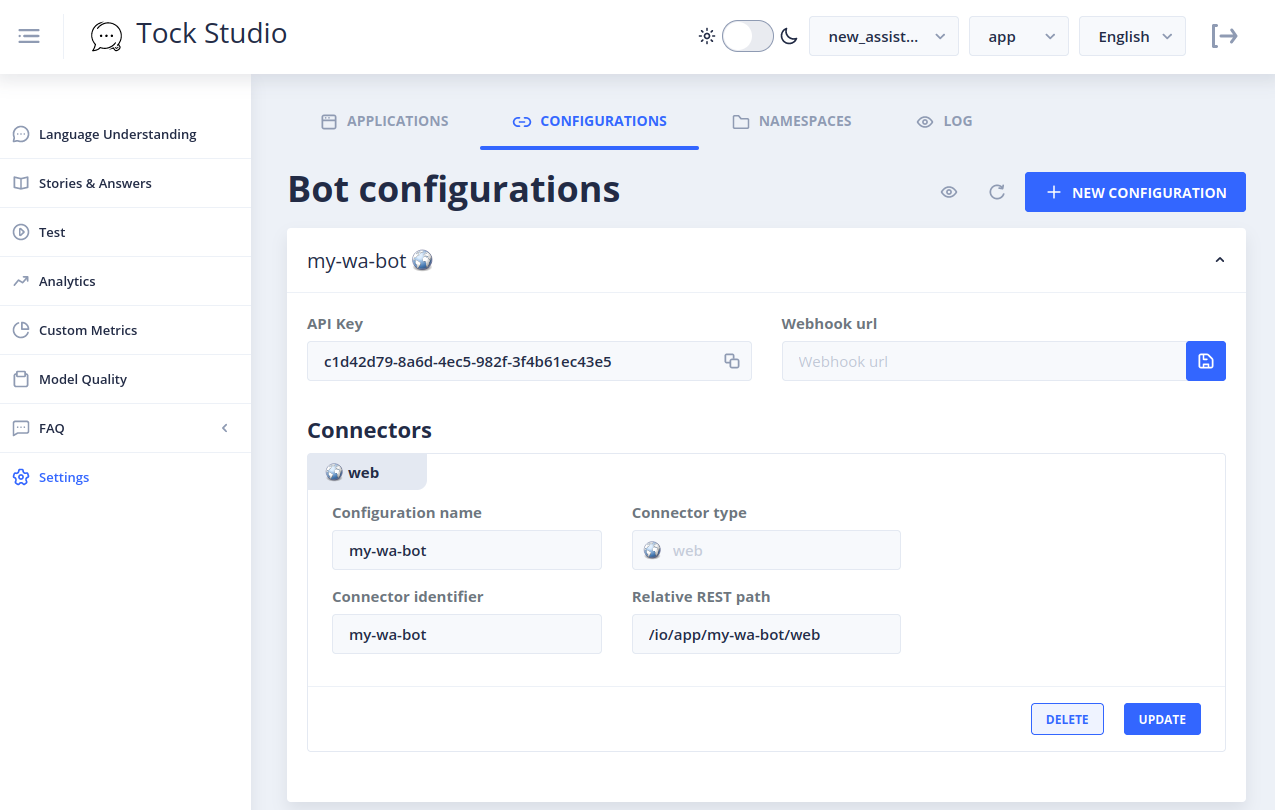
Take notice of the "Relative REST path" of the connector. This is the path that we will use to send messages to Tock.
This path is relative to the base URL of your Tock Bot container (tock/bot_api).
Creating a first scenario
If you have no previous experience with Tock, you will need to create a scenario. A scenario is a set of intents and responses that the bot can understand.
Check out this video to learn how to create a scenario in Tock:
The code
I chose to design this bot with 2 different modes:
- A "moving" mode where the bot is listening for players moving around. When a player enters an area, the bot will run a prompt to ask ChatGPT where to move next. TODO TODO TODO
- A "chatting" mode where the bot is listening for players entering a bubble with the bot. When a player enters the bubble, the bot will start chatting with the player.
There are therefore 2 different prompts, generated dynamically.
The "moving" mode
TODO
The "chatting" mode
In order to chat with the users, we will need to make queries to the Tock.ai server. We will use the fetch function
for this.
The Web connector API is described in the Tock documentation.
A query looks like this:
POST /io/{app_name}/{bot_name}/{connector_name}
{
  "query": "Hello, how are you?",
  "userId": "1234"
}
And the response looks like this:
{
  "responses": [
    {
      "text": "I'm fine, thank you. How can I help you?",
    }
  ]
}
We will create a simple "client" class that will handle the communication with the Tock.ai server.
One important thing to note is that we need to generate a new userId for each conversation. But in WorkAdventure,
several users can be in the same bubble and chat at the same time with the bot. We need to make sure that all the users in
the same bubble share the same userId.
To do this, we will generate a random userId each time the bot detects it is entering a new bubble.
The WA.player.proximityMeeting.onJoin function will be used to detect when the bot enters the bubble.
export class TockClient {
  private userId: string = "";

  constructor(private url: string) {
    // Each time we enter a new bubble, we generate a new userId.
    WA.player.proximityMeeting.onJoin().subscribe((event) => {
      // Generate a random ID for the user.
      this.userId = Math.random().toString(36).substring(2, 15);
    });
  }

  /**
   * Performs a query to Tock and returns the answer.
   */
  public async query(question: string) {
    const response = await fetch(this.url, {
      method: "POST",
      headers: {
        "Content-Type": "application/json",
      },
      body: JSON.stringify({
        query: question,
        // Everybody in the same bubble needs to share the same userId.
        userId: this.userId,
      }),
    });

    if (!response.ok) {
      throw new Error(`Failed to query Tock: ${response.statusText}`);
    }

    const data = await response.json();
    return data.responses;
  }
}
Now that we know how to query Tock, we can call Tock each time a user is typing something in the chat.
We can detect the user typing with the WA.chat.onChatMessage function.
WA.chat.onChatMessage(
    (message, event) => {
        if (!event.author) {
            // We are receiving our own message, let's ignore it.
            return;
        }

        this.tockClient.query(message).then((answers) => {
            for (const answer of answers) {
                WA.chat.sendChatMessage(answer.text, {
                    scope: "bubble",
                });
            }
        }).catch((e) => {
            console.error(e);
        });
    },
    {
        scope: "bubble",
    }
);
Improving the bot interactions
As of now, the bot is capable of talking back to us, but not much more. The fact that the bot is part of a virtual world offers plenty of opportunities and we want to take advantage of those.
Out of the boc, Tock Studio does not allow to return something else than an anw