
This tutorial shows you how to create doors, which
- open automatically when you get close to them
- can get locked when you are inside the room and no one outside the room can unlock them
The tutorial also shows you how you can install a bell close to the door and everyone within a short radius can hear the bell.
Preparation
- Search for door (open and closed state) and bell tiles.
- Find a sound file for the bell. Make sure you got the right license for your project to use it.
- Make sure your map was built on the WorkAdventure Starter-Kit in order to have a ready to use API
Our battle plan
We will make this door system in 3 steps:
- Create a simple door that can be operated from the inside of the room
- Make sure the door can be operated from the outside of the room if there is no one inside
- Add a bell
Step 1: Creating the door
To implement a proper door system, we will rely on WorkAdventure scripting API. The scripting API allows you to write Javascript / Typescript code that will be executed in the browser of each player.
The scripting API can modify the local map of the player. We will use it to open and close the door (by hiding or showing the correct layers). When you show or hide a layer using the scripting API, it only happens locally (in the browser of the user). It does not affect the map for other users by default.
We will therefore need a way to synchronize the state of the door between all players. We will use "variables" to do that. Variables can be attached to a map or to a player.
We will create a variable attached to the map named doorState that will contain the state of the door (open or closed). When a player opens or closes the door, we will update the variable.
When a player enters the room, we will check the state of the door. If the door is closed, we will open it automatically.

On the map (using Tiled)
Preparing the layers
Prepare a door tile with an open and closed door state on your map.
Place the tiles in a folder called door and name the open door tile layer door_opened and the closed door door_closed
Make sure you hide the open_doorstate (click on the 'eye' image). The default state of the door is closed.

Creating the door variable
Map variables must be declared in Tiled before being usable in the scripting API.
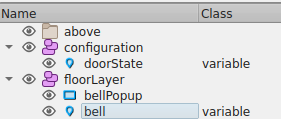
Create a new object layer above the floorLayer and call it configuration.
Now create a new object point ![]() and call it
and call it doorState.
You can also use any other name for it, but then you need to make sure that you adjust the variables in the code.
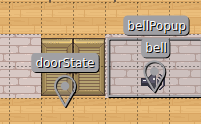
You can put the point wherever you want on the map, it does not matter.
If you want to create a map with several doors, each door should have its own variable with its own name.

Make sure the doorState object point is located under the configuration layer.
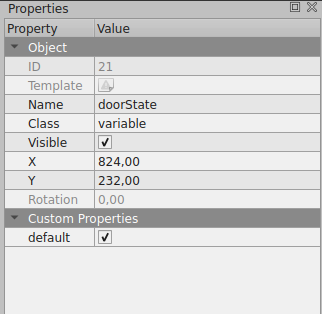
Now we need to turn this "point" object into a real "variable". Go to the doorState
object and write in the value field of class the name variable.
Also add a custom property of type booleanand give it the name default. Select the default property.
Variables can be declared in any object layer. However, if you explicitly declare it in a layer named configuration,
the variable will automatically appear and be editable in the "Configure the room" menu of WorkAdventure.
Defining the door steps
We need to define tiles before and behind the door, which are triggered when the WOKA walks on it. They either open or close the door.
Create a new tile folder called doorsteps and define two different layer types inside the folder: outside_doorstep and inside_doorstep.
outside_doorstep is the area when you enter the door and inside_doorstep the area in the room, when you want to close the door.
Define the tiles for both areas. If the Woka steps on these tiles the door opens or closes.
And finally click in the Navigation on Map then Map Properties
and double-check the custom property script is set to src/main.ts.
Save your map.
Coding the door
Make sure you have a src folder in your map repository. You can also use this Github Repo as a reference.
There should be a main.ts file here. If not, create the main.ts file.
Add the following code:
/// <reference types="@workadventure/iframe-api-typings" />

import { bootstrapExtra } from "@workadventure/scripting-api-extra";
import {ActionMessage} from "@workadventure/iframe-api-typings";

console.log('Script started successfully');

/**
 * Utility function to display the correct door image depending on the state of the door.
 */
function displayDoor(state: boolean) {
    if (state === true) {
        WA.room.showLayer('door/door_opened');
        WA.room.hideLayer('door/door_closed');
    } else {
        WA.room.hideLayer('door/door_opened');
        WA.room.showLayer('door/door_closed');
    }
}

// Waiting for the API to be ready
WA.onInit().then(async () => {
    console.log('Scripting API ready');

    // The line below bootstraps the Scripting API Extra library that adds a number of advanced properties/features to WorkAdventure
    // Most notably for us, it is used to generate the "Configure the room" menu and to handle the "bell".
    bootstrapExtra().then(() => {
        console.log('Scripting API Extra ready');
    }).catch(e => console.error(e));


    // The doorState variable contains the state of the door.
    // True: the door is open
    // False: the door is closed
    // Upon load, the function bellow is called to initiate the door state.
    displayDoor(WA.state.doorState);

    // After load, we listen to variable change to display the correct door image.
    WA.state.onVariableChange('doorState').subscribe((doorState) => {
        // Each time the "doorState" variable changes, we call the "displayDoor" function to update the door image visually.
        displayDoor(doorState as boolean);
    });

    let openCloseMessage: ActionMessage | undefined;

    // When someone walks on the doorstep (inside the room), we display a message to explain how to open or close the door
    WA.room.onEnterLayer('doorsteps/inside_doorstep').subscribe(() => {
        openCloseMessage = WA.ui.displayActionMessage({
            message: "Press 'space' to open/close the door",
            callback: () => {
                WA.state.doorState = !WA.state.doorState;
            }
        });
    });

    // When someone leaves the doorstep (inside the room), we remove the message
    WA.room.onLeaveLayer('doorsteps/inside_doorstep').subscribe(() => {
        if (openCloseMessage !== undefined) {
            openCloseMessage.remove();
        }
    });
}).catch(e => console.error(e));

export {};
A quick explanation of the code:
The script makes use of the WA global object that is provided by the WorkAdventure scripting API.
This object provides a few objects / methods that we will use:
WA.onInit()is a method that returns a Promise that is resolved when the scripting API is ready to be used. We need to wait for WorkAdventure to be ready before we can use the complete scripting API.WA.room.showLayer()andWA.room.hideLayer()are methods that allow us to show or hide a layer on the map. In our case, we want to show or hide thedoor/door_openedanddoor/door_closedlayers depending on the state of the door.- The
WA.stateobject contains all the variables that are attached to the map. We can use it to read or write thedoorStatevariable usingWA.state.doorState. WA.state.onVariableChangecan be used to listen to variable changes. In our case, we want to update the door image each time thedoorStatevariable changes.WA.room.onEnterLayerandWA.room.onLeaveLayeris used to detect when we enter or leave a doorstep.- When we enter the doorstep, we display an action message using the
WA.ui.displayActionMessagemethod. This action message will display a message to the user and will allow him to press the "space" key to open or close the door. When the user presses the "space" key, we update thedoorStatevariable.
With this script, we have a working door that can be operated from inside the room. However, we have an issue. If someone is inside the room, closes the door, and then closes the WorkAdventure tab, no one will be able to open it again from the outside.
We will solve this issue in the next step.
Step 2: Opening the door from the outside if the room is empty
If the door is closed, and if no one is inside, we want to open the door automatically.
In order to do that, we will attach a "currentRoom" variable to each player. This variable will contain the name of the meeting room the player is currently in.
When a player enters the room, we will set the variable to the name of the room. When a player leaves the room, we will set the variable to undefined.
Each player can read the currentRoom variable of other players. We will use this to check if someone is inside the room.
On the map (using Tiled)
We will define a new layer named meetingRoom that will be used to define the meeting room area.
Put some tiles in this layer to define the meeting room area.
You can put this layer at the bottom of the layer list if you want it to be not visible. Also, pressing the "H" key in Tiled will display the layer in transparency mode, so you can view your layer, even if it is hidden bellow the floor.
In the code
In the main.ts file, add the following code:
    WA.room.onEnterLayer('meetingRoom').subscribe(() => {
        WA.player.state.saveVariable("currentRoom", "meetingRoom", {
            public: true,
            persist: false
        });
    });

    WA.room.onLeaveLayer('meetingRoom').subscribe(() => {
        WA.player.state.saveVariable("currentRoom", undefined, {
            public: true,
            persist: false
        });
    });
The WA.player.state object is used to read or write variables that are attached to the player.
In our case, we want to write the currentRoom variable. We use the WA.player.state.saveVariable
to set this variable. You will notice we pass 2 additional parameters to this method:
{
    public: true,
    persist: false
}
The public parameter is used to make the variable readable by other players. If you set it to false, other players will not be able to read the variable.
The persist parameter is used to make the variable persistent. If you set it to true, the variable will be saved. If the player closes
the WorkAdventure tab and comes back later, the variable will still be there. In our case, we don't want this variable to be persistent, so we set it to false.
Now that we successfully write the currentRoom variable, we need to read it to check if someone is inside the room.
In the main.ts file, add the following code:
    // We need to call this method to tell WorkAdventure to send players information to the scripting API
    await WA.players.configureTracking({
        players: true,
        movement: false,
    });

    // When someone walks on the doorstep (outside the room), we check if the door is closed
    // If the door is closed, and if no one is inside (because no player has the "currentRoom" variable set to "meetingRoom"),
    // we open the door automatically.
    WA.room.onEnterLayer('doorsteps/outside_doorstep').subscribe(() => {
        if (WA.state.doorState === false) {
            const players = WA.players.list();
            for (const player of players) {
                if (player.state.currentRoom === "meetingRoom") {
                    // Someone is in the room
                    return;
                }
            }
            // If no one is in the room and if the door is closed, we open it automatically
            WA.state.doorState = true;
        }
    });
A quick explanation of the code:
WA.players.configureTrackingis used to tell WorkAdventure to send players information to the scripting API. In our case, we want to know when a player enters or leaves a room. We therefore set theplayersparameter totrue. We don't need to know when a player moves, so we set themovementparameter tofalse.WA.players.listis used to get the list of players that are currently connected to the map. It returns a list of remote players. Each player has astateproperty that contains the public variables attached to the player.- Each time the user enters the
doorsteps/outside_doorsteplayer (so each time the user gets need to the door from the outside), we check if the door is closed. If it is closed, we get the list of players. For each player, we check if thecurrentRoomvariable is set tomeetingRoom. If it is the case, it means that someone is inside the room. We don't open the door. If no one is inside the room, we open the door.
Step 3: configure a bell
In order to add a bell, we will be using the Scripting API Extra library. This library is already installed in the WorkAdventure Starter Kit. It features a "bell" functionality that allows you to add a bell to your map using only Tiled properties.
Create a new point object ![]() called
called bell. You can also use any other name for it, but then you need to make sure that you adjust the variables in the code.
Then, create one rectangle ![]() called
called bellPopup for the Pop-up window area for the bell.
Now go to the bell object and declare the object as a variable as in the step before.
Create a custom property of the type boolean and name it bell. Select the bell custom property.
For the Bell Sound: Create a custom property of the type string and name it bellSound. Enter the name of your sound file. Make sure you have placed your music file it in your public folder.
For the Bell Radius: Create a custom property of the type stringand name it soundRadius enter 200 to make sure just Wokas, which are near the door are able to hear it. The value is expressed in pixels. A Woka is 32 pixels tall.
Save your map.
For the bell Pop up window:
The bell pop up window is shown, when you walk close to the bell. Create a new tile layer called bellZone with the
following Custom Properties:
bellButtonText of type string: This is the text or the emoji that appears in the window.
bellPopup of type string with the value bellPopup : This is the Pop up Window itself.
bellVariable of type string with the value bell
Final result
Success! We now have a door that can be opened from the inside or the outside, and that can be locked if someone is inside the room. We also have a bell that can be rung by anyone close to the door.
The final, complete script is shown below:
/// <reference types="@workadventure/iframe-api-typings" />

import { bootstrapExtra } from "@workadventure/scripting-api-extra";
import {ActionMessage} from "@workadventure/iframe-api-typings";

console.log('Script started successfully');

/**
 * Display the correct door image depending on the state of the door.
 */
function displayDoor(state: unknown) {
    if (state === true) {
        WA.room.showLayer('door/door_opened');
        WA.room.hideLayer('door/door_closed');
    } else {
        WA.room.hideLayer('door/door_opened');
        WA.room.showLayer('door/door_closed');
    }
}

// Waiting for the API to be ready
WA.onInit().then(async () => {
    console.log('Scripting API ready');

    // The line below bootstraps the Scripting API Extra library that adds a number of advanced properties/features to WorkAdventure
    bootstrapExtra().then(() => {
        console.log('Scripting API Extra ready');
    }).catch(e => console.error(e));

    await WA.players.configureTracking({
        players: true,
        movement: false,
    });

    // The doorState variable contains the state of the door.
    // True: the door is open
    // False: the door is closed
    // We listen to variable change to display the correct door image.
    WA.state.onVariableChange('doorState').subscribe((doorState) => {
        displayDoor(doorState);
    });

    displayDoor(WA.state.doorState);

    let openCloseMessage: ActionMessage | undefined;

    // When someone walks on the doorstep (inside the room), we display a message to explain how to open or close the door
    WA.room.onEnterLayer('doorsteps/inside_doorstep').subscribe(() => {
        openCloseMessage = WA.ui.displayActionMessage({
            message: "Press 'space' to open/close the door",
            callback: () => {
                WA.state.doorState = !WA.state.doorState;
            }
        });
    });

    // When someone leaves the doorstep (inside the room), we remove the message
    WA.room.onLeaveLayer('doorsteps/inside_doorstep').subscribe(() => {
        if (openCloseMessage !== undefined) {
            openCloseMessage.remove();
        }
    });

    WA.room.onEnterLayer('meetingRoom').subscribe(() => {
        WA.player.state.saveVariable("currentRoom", "meetingRoom", {
            public: true,
            persist: false
        });
    });

    WA.room.onLeaveLayer('meetingRoom').subscribe(() => {
        WA.player.state.saveVariable("currentRoom", undefined, {
            public: true,
            persist: false
        });
    });

    // When someone walks on the doorstep (outside the room), we check if the door is closed
    // If the door is closed, and if no one is inside (because no player has the "currentRoom" variable set to "meetingRoom"),
    // we open the door automatically.
    WA.room.onEnterLayer('doorsteps/outside_doorstep').subscribe(() => {
        if (WA.state.doorState === false) {
            const players = WA.players.list();
            for (const player of players) {
                if (player.state.currentRoom === "meetingRoom") {
                    // Someone is in the room
                    return;
                }
            }
            // If no one is in the room and if the door is closed, we open it automatically
            WA.state.doorState = true;
        }
    });

}).catch(e => console.error(e));

export {};