Configuring quests
Introduction
The Quests and Badges system is a gamification feature integrated into the SAAS version of WorkAdventure. It offers administrators a way to significantly increase user engagement by introducing dynamic challenges and rewarding accomplishments.
Preset quests
WorkAdventure comes with 2 preset quests:
- the Marathon: users are awarded badges based on the distance they have walked
- the Bubble Master: users are awarded badges based on the time they spent chatting in a bubble
Enabling preset quests
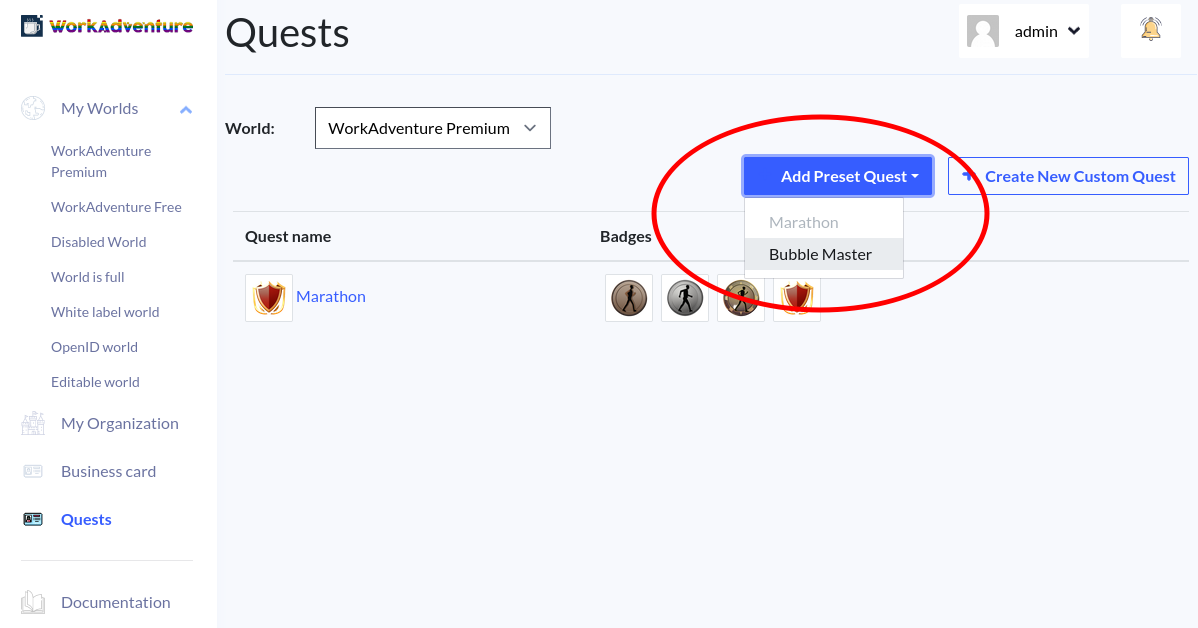
If you want to enable the "Marathon" or the "Bubble Master" quest in your world, head over to the admin dashboard.
In the left menu, click the "Quests" menu item, then click the "Add Preset Quest" button.
Simply click on the quest you want to enable.
The quest will appear in the quest list. A number of badges are automatically created for this quest. Feel free to edit / change / delete these badges the way you want.
Testing the quests
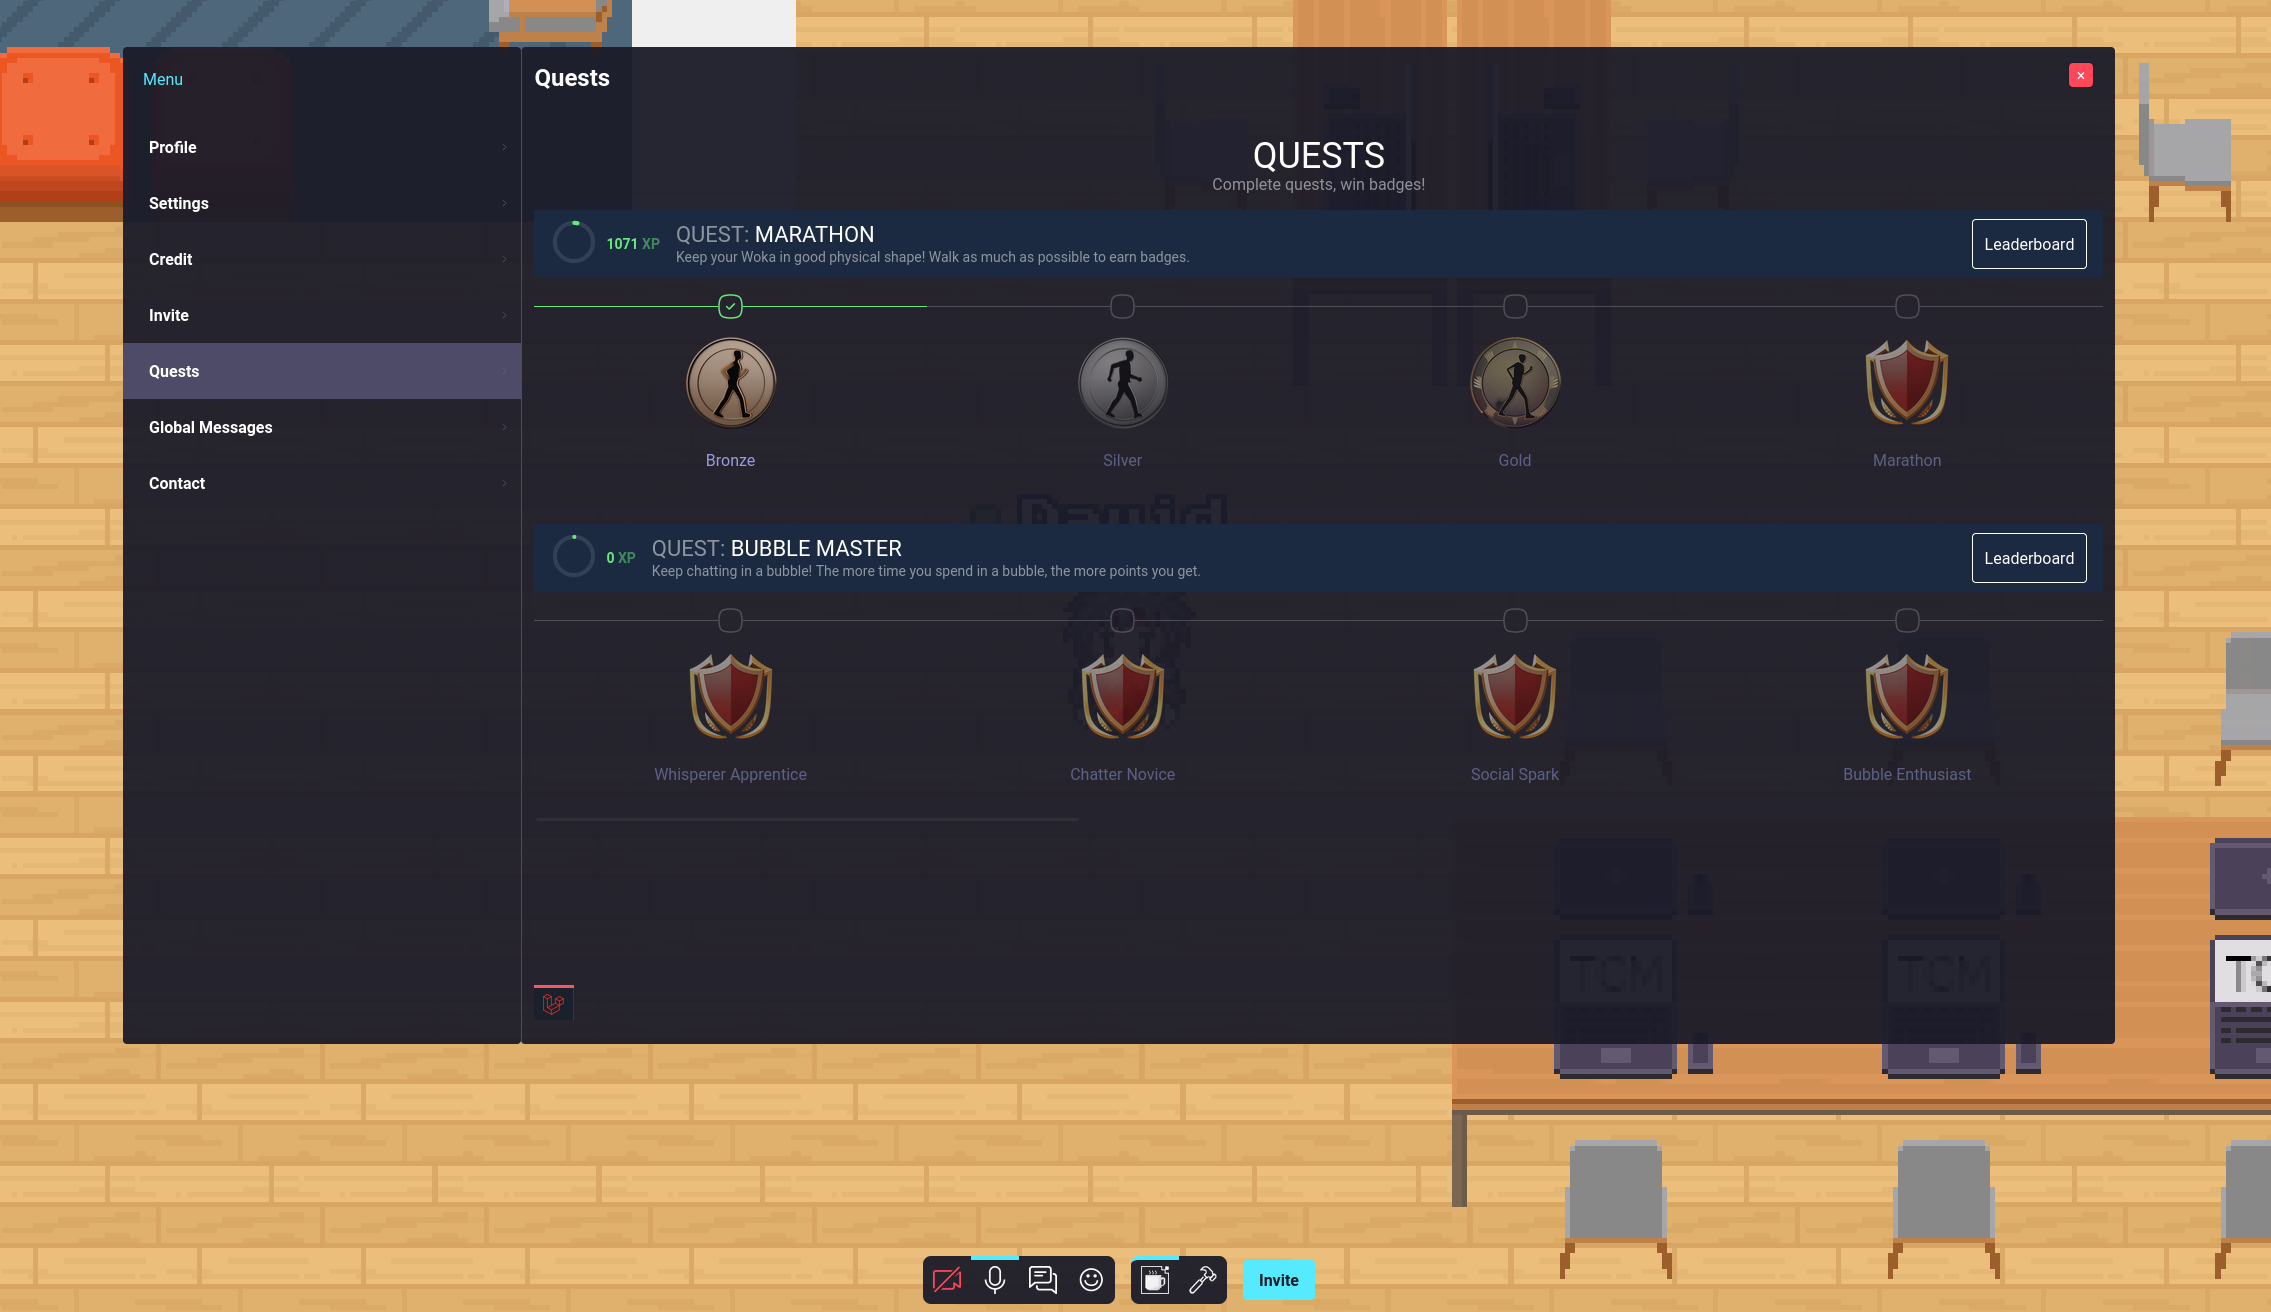
When the quests are enabled, simply connect to one of the maps of your world.
In the main menu, you should now see a "Quests" item appearing. Click on it to see the list of quests and the list of badges you have been awarded.
Custom quests
While the preset quests are pretty enjoyable, it is important to understand that these are only demo quests. The system is designed to be flexible and allow administrators to create quests and badges that are tailored to their specific needs. In order to create a custom quest, you will need to write a script in your map that defines how the goals of the quest are fulfilled. It means the design and coding of the "game" part is up to you (the map builder) and WorkAdventure quest system will handle saving the progress of the players, awarding badges and publishing a leaderboard.

Quests and badges
You can view each quest as a mini-game.
Each member playing a quest can have a score (we call it "XP"). A quest can contain one or more badges that are awarded to players when they reach a certain score or when they perform a certain action.
Both the score and badges are optional. You will generally use one of those, or both at the same time.
Example: you design a treasure hunt with a set of enigma to solve. Each enigma solved gives the player a badge. You don't need XP for this treasure hunt.
Example 2: you design an egg hunt for Easter. Each egg found gives the player 10 XP. When a player reaches 100 XP, a bronze badge is awarded. At 200 XP, a silver badge is awarded and at 500 XP, a gold badge is awarded.
In WorkAdventure, each player can see his/her own score and the list of badges that he/she won. Also, a leaderboard can be displayed with the top 10 players with the highest XP for each quest.
In the admin dashboard, the administrator can create quests and badges, but also manually grant badges.
In order to participate in a quest and to earn badges, players must be logged in. They don't necessarily need to be part of the members of your world, but they at least need to be authenticated.
Creating a quest
To create your first quest, connect to the admin dashboard.
In the left menu, click the "Quests" menu item, then click the "Create New Custom Quest" button.
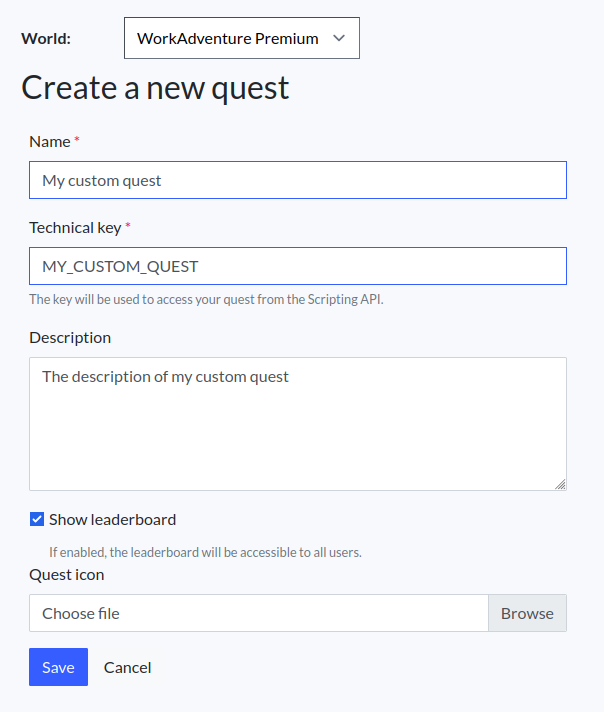
To create a quest, you need to define:
- its name: this name will be displayed to your players
- its technical key: this is the identifier of your quest. Each time you access your quests from the scripting API, you will need the technical key to identify your quest (for instance, to grant XP to a player)
- its description: this description will be displayed to your players
- its image: you can attach an image to your quest. It should be a square image (ideally 512x512 pixels) that will be displayed in the leaderboard.
- Whether or not the leaderboard should be displayed for this quest. If you want to make your quest competitive, displaying the leaderboard is a great idea!
Even if you choose to not display the leaderboard to end users, the scores are still computed and stored. It means administrators always have access to the leaderboard (from the quest page in the admin dashboard). The leaderboard can also be accessed via API (see below), if you want to disable the default leaderboard display to provide your own custom display instead.
After creating a quest, clicking on the quest in the quest list screen will bring you to the quest details page.
On this page, you can view the list of badges associated with the quests, and the leaderboard.

Creating a badge
From the quest details page, you can create a badge using the "Create New Badge" button.
A badge requires:
- its name: this name will be displayed to your players
- its technical key: this is the identifier of your badge. Each time you access your badges from the scripting API, you will need the technical key to identify your badge (for instance, to grant a badge to a player)
- its description: this description will be displayed to your players
- the required XP necessary to earn the badge. This field is optional. If you put a value, the user will automatically earn this badge when he/she reaches the amount of XP required on the quest associated to the badge.
- its image: you can attach an image to your badge. It should be a square image (ideally 512x512 pixels) that will be displayed in the quests page and in the leaderboard.
![]()
After creating a badge, clicking on the bagde in the quest details page will bring you to the badge details page.
On this page, you can view the list of members who earned the badge. Additionally, you can manually grant or revoke badges.
![]()
Implementing a quest using the Scripting API
With your quest and badge created, you can now start writing the script that will grant XP to your players.
If you are not familiar with the scripting API yet, we highly recommend starting reading the scripting API guide first.
In the rest of this document, we will assume your map was built using the "WorkAdventure Map Starter Kit".
Importing the Quest package
In your map, the first step is to import the "@workadventure/quest" package.
This package contains a number of ready to use functions to interact with the quest system.
At the root of your map repository, run:
npm install @workadventure/quests
Granting XP
In order to grant XP to a player, you can call the levelUp function.
import { levelUp } from "@workadventure/quests";

await levelUp("QUEST_KEY", 24);
This will automatically grant 24 points to the current user, on the quest whose key is "QUEST_KEY".
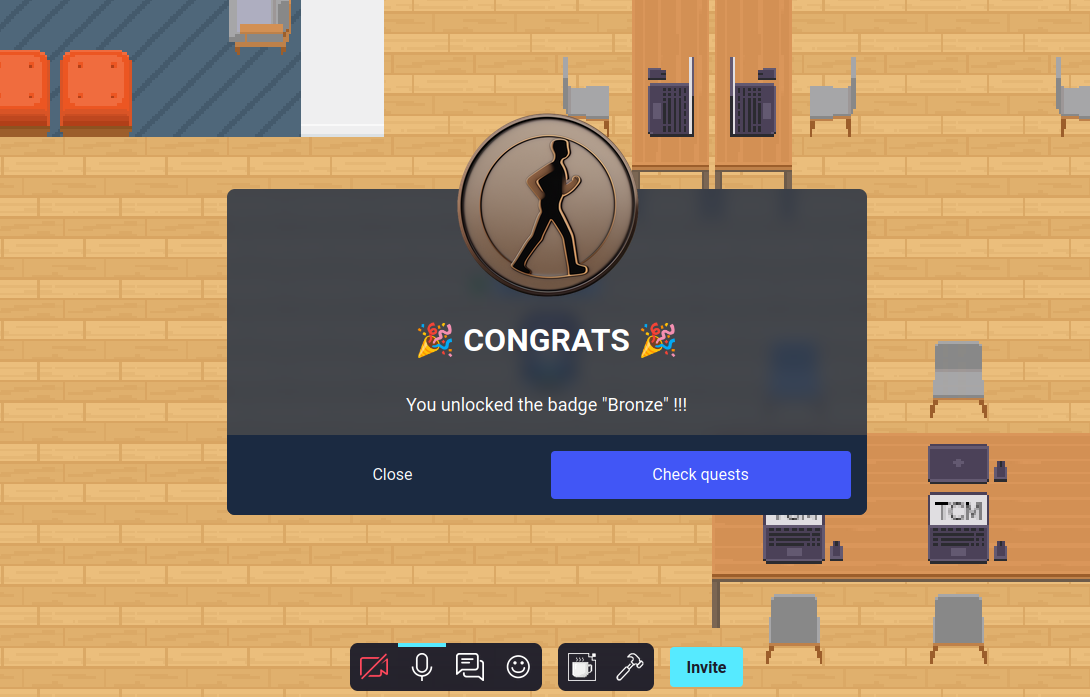
If the player reaches a badge threshold, the badge will be automatically granted to the player. In addition, a congratulation popup will be displayed to the player.
Note: the quest does not need to be created in the admin dashboard yet. You can create the quest later.
Getting the current XP of a player and quest details
In order to get the current XP of a player, you can call the getQuest function.
import { getQuest } from "@workadventure/quests";

const quest = await getQuest("QUEST_KEY");

console.log(quest);

// {
//   "key": "QUEST_KEY",
//   "name": "My Quest",
//   "description": "This is my quest",
//   "image": "https://my-quest-image.png",
//   "xp": 24,
//   "badges": [
//     {
//       "key": "BADGE_KEY",
//       "name": "My Badge",
//       "description": "This is my badge",
//       "image": "https://my-badge-image.png",
//       "granted": true
//     }
//   ]
Getting the leaderboard (JSON)
In order to get the leaderboard of a quest as JSON data, you can call the getLeaderboard function.
import { getLeaderboard } from "@workadventure/quests";

const leaderboard = await getLeaderboard("QUEST_KEY");

console.log(leaderboard);

// [
//   {
//     "name": "John Doe",
//     "xp": 24
//   },
//   {
//     "name": "Jane Doe",
//     "xp": 12
//   }
// ]
Getting the leaderboard (HTML)
To get the leaderboard as HTML, you can call the getLeaderboardURL function. It will return a URL that you can
use in an iframe. The getLeaderboardURL function returns a URL object.
import { getLeaderboardURL } from "@workadventure/quests";

const leaderboardURL = getLeaderboardURL("QUEST_KEY");

// Open a modal with the leaderboard
WA.ui.modal.openModal({
    title: "Your quest",
    src: leaderboardURL,
    position: "center",
    allowApi: false,
    allow: "",
}, () => {});