Connecting using OpenID Connect
If your authentication provider is compatible with OpenID Connect, you can allow your users to authenticate to WorkAdventure using their existing credentials. By integrating an external OpenID provider, WorkAdventure enables users to log in with their existing login information, making the process easier and more convenient. This also provides an additional layer of security, as authentication is handled by your provider rather than WorkAdventure itself.
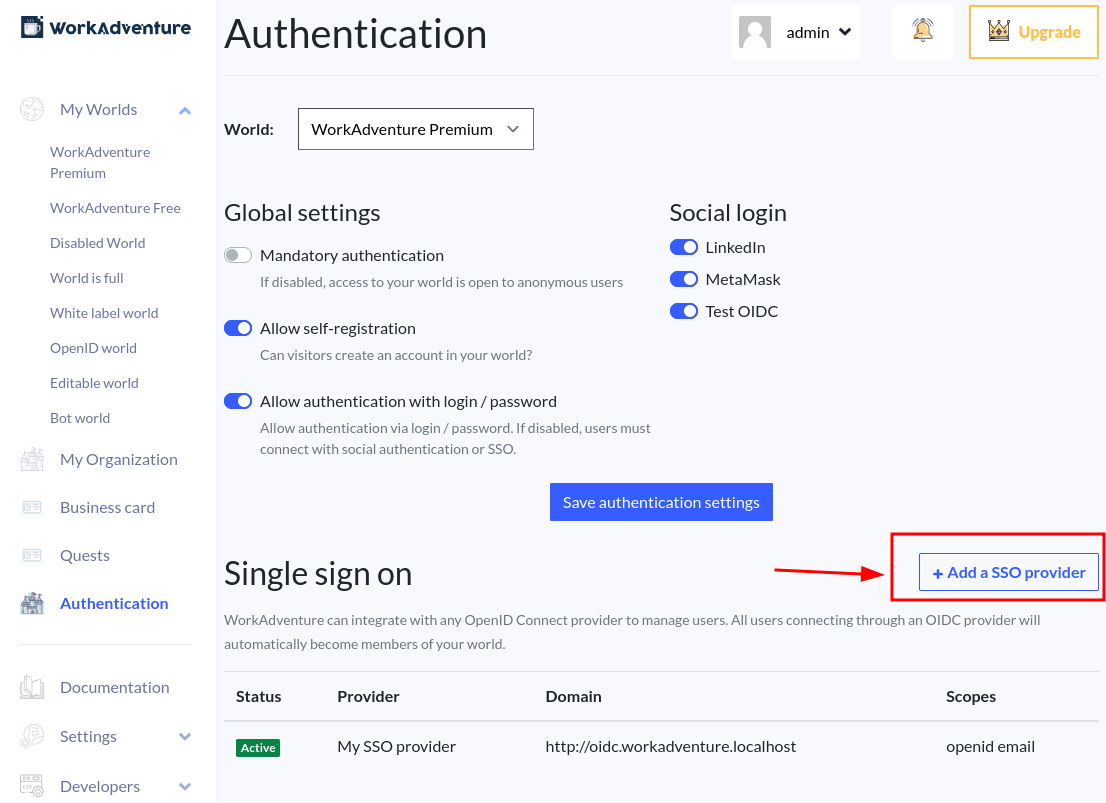
To access the OpenID Connect settings, go to the admin dashboard and click on the Authentication menu item. From there, click on the Add a SSO provider button.
Configuring Your OpenID Connect Settings
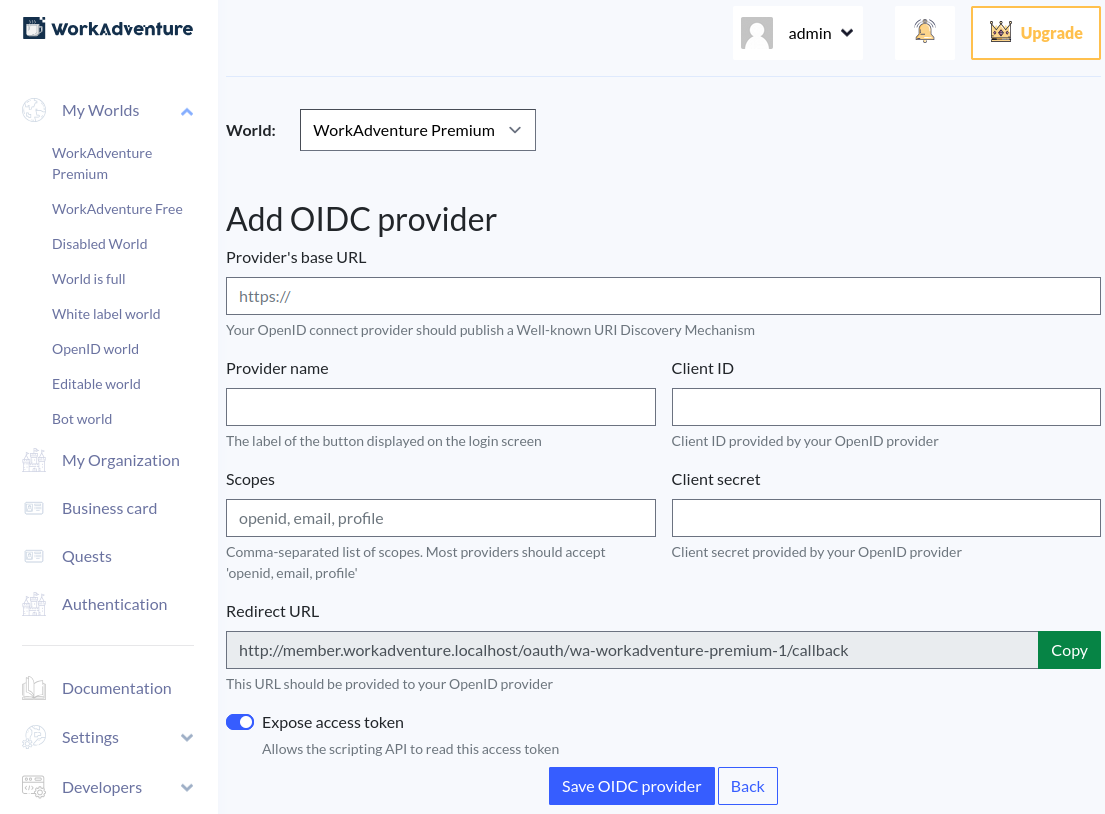
First of all, to create a new "client" in your OpenID Connect provider, you will need to provide a Redirect URI. This is the URL where your OpenID Connect provider will redirect the user after the authentication process.
The redirect URI is available from the OIDC provider creation page in WorkAdventure.
To configure your provider, you will need to fill in the following five fields:
- Provider Name: The name of your SSO settings for WorkAdventure; this does not affect the OpenID Connect protocol. The name is used as the text of the button in the login page.
- Client ID: The ID provided by your OpenID Connect provider.
- Client Secret: The secret provided by your OpenID Connect provider.
- Provider's base URL: The URL of your provider. Your OpenId SSO provider should have well-know configuration setting defined URL:
/.well-known/openid-configuration. For example for the Google OpenId provider, the well-know configuration URL ishttps://accounts.google.com/.well-known/openid-configuration, so the OpenId domain ishttps://accounts.google.com - Scopes: The scope available for your OpenID provider (e.g.
openid,profile,email, etc.). You should at least include theopenidscope. We highly recommend including theemailandprofilescopes as well.
Testing your OpenID Connect provider
To test your OpenID Connect provider, enter the URL of your map in a browser.
- If you are allowing anonymous access, you will arrive at the map directly. From there, click the Menu button in the action bar, then click Login. You will be redirected to the login page.
- If you are not allowing anonymous access, you will be redirected to the login page directly.
The login page now features a new button:
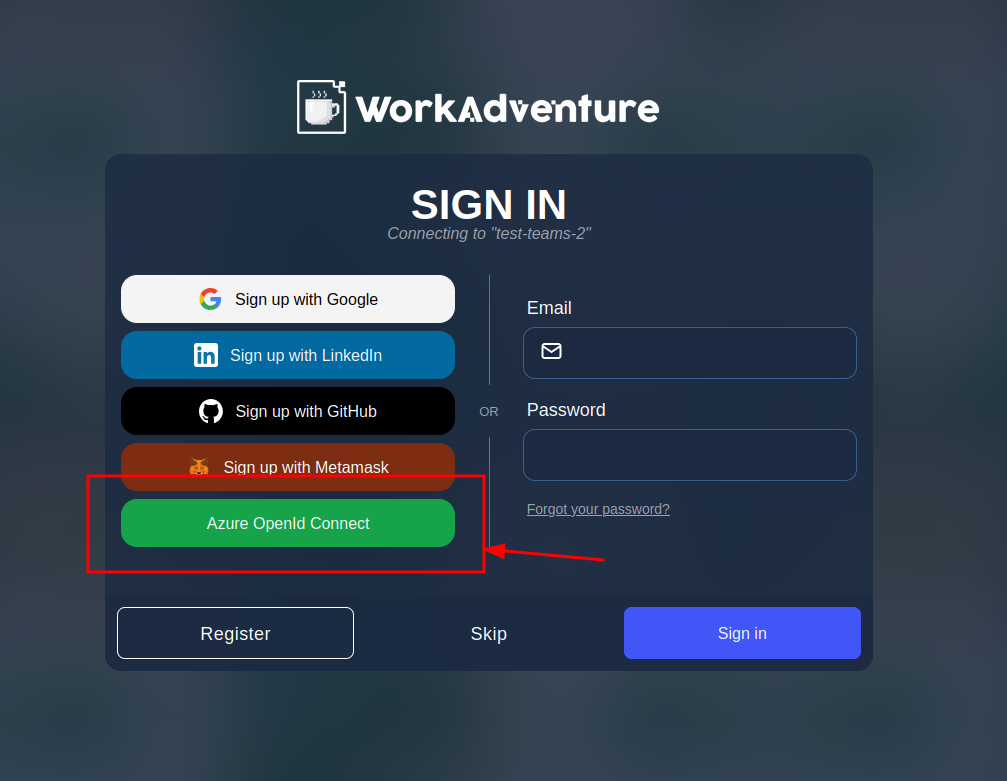
Click on the button to start the OpenID Connect authentication process.
If any error occurs during the authentication process, you might have a problem with the configuration of your OpenID Connect provider. You can go back to the admin dashboard and refresh the OpenID Connect configuration page. The error message will be displayed here.
Making your SSO connection mandatory
By default, adding an OpenID Connect provider will add an additional way for your users to connect. The existing login methods (anonymous, email/password, social logins) will still be available.
If you want to make the OpenID Connect provider the only way to connect to your world, you can disable the other login methods in your world settings.
From your world dashboard, click the Edit button.
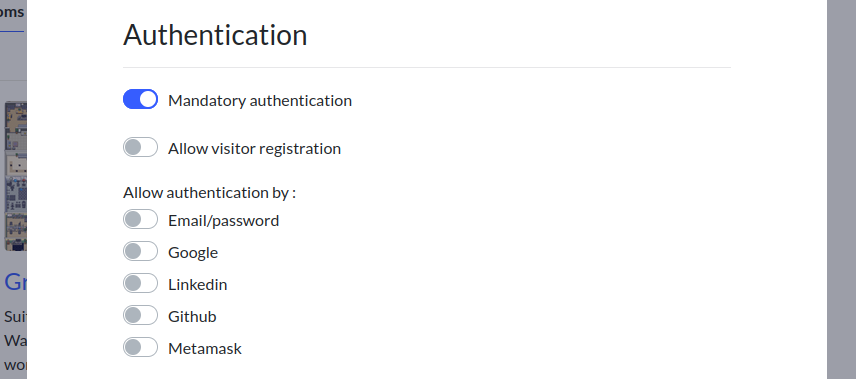
In the Authentication section, check Mandatory authentication, and uncheck all the other authentication methods.
SSO settings information
Below is additional information you might need to configure your OpenID Connect provider:
- Our domain is:
https://admin.workadventu.re. - The redirect URI of your SSO settings will be
https://member.workadventu.re/oauth/<application_id>/callback - Our privacy policy:
https://workadventu.re/privacy-policy - Our term of use:
https://workadventu.re/terms-of-use - Our cookie policy:
https://workadventu.re/cookie-policy - Our Sub-processors:
https://workadventu.re/subprocessors
Example: Connecting to Google OpenId provider
Create your API Key
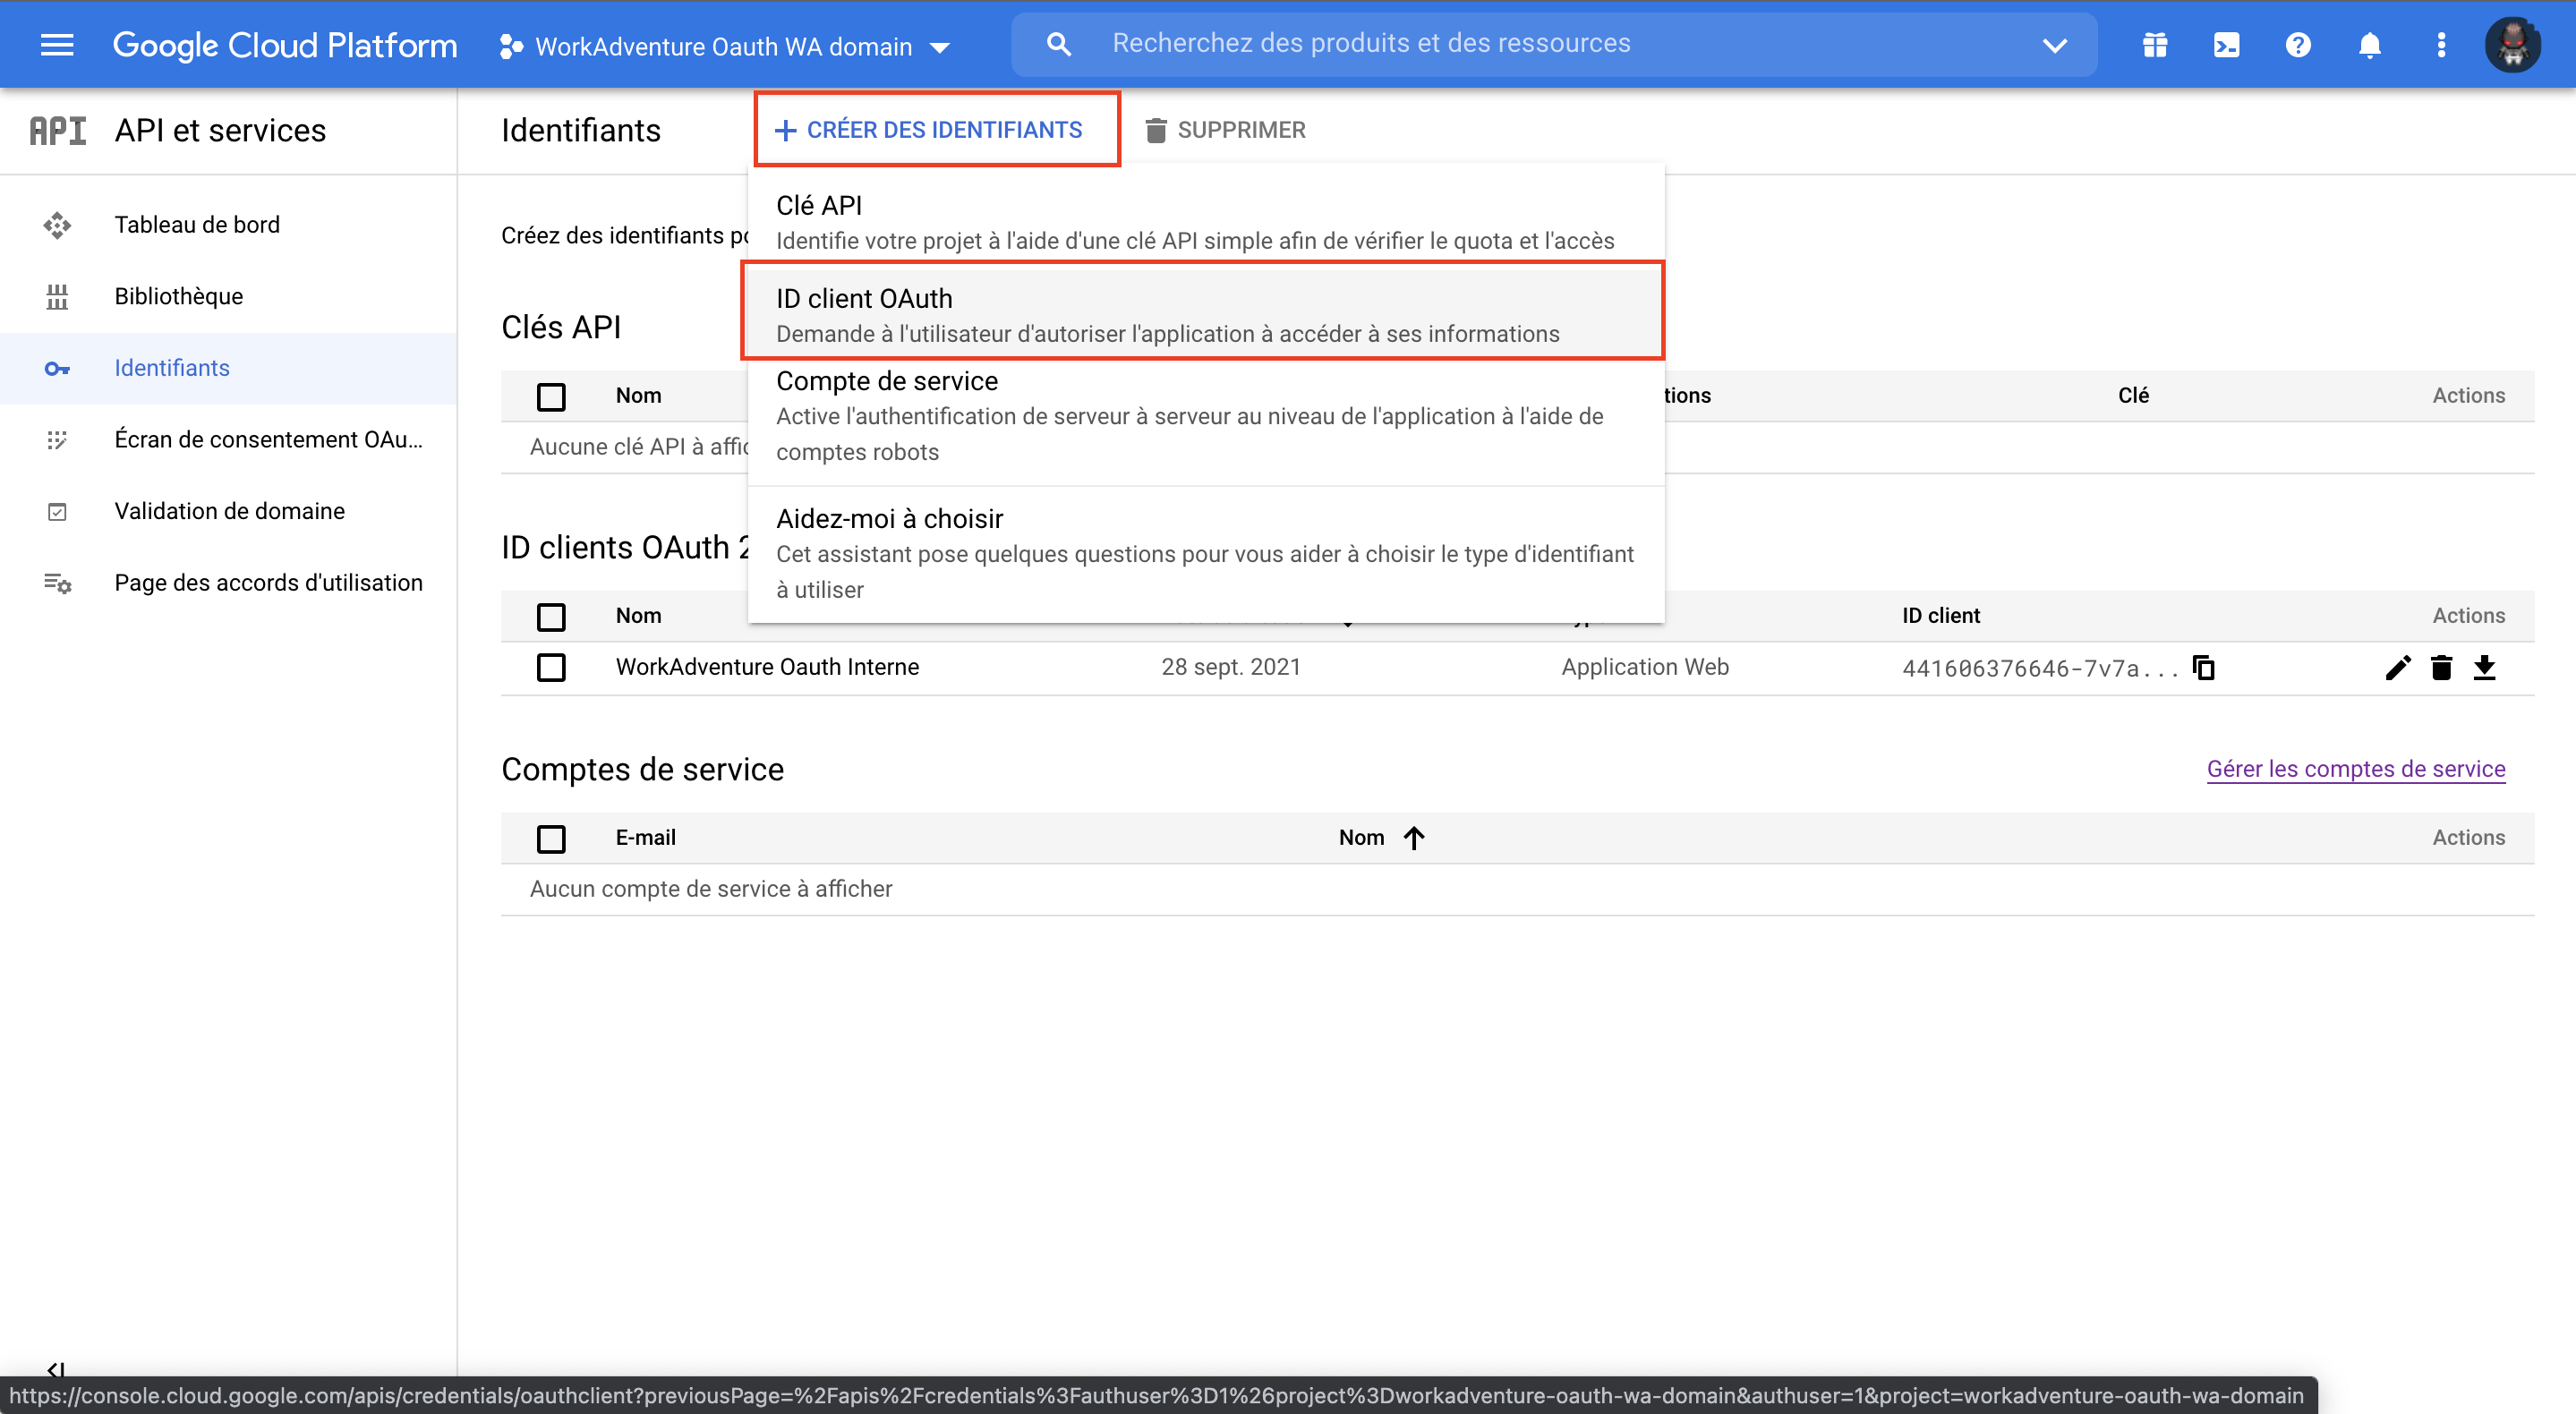
Go to Google Cloud Platform : https://console.cloud.google.com/apis/credentials
Create an ID client Oauth.
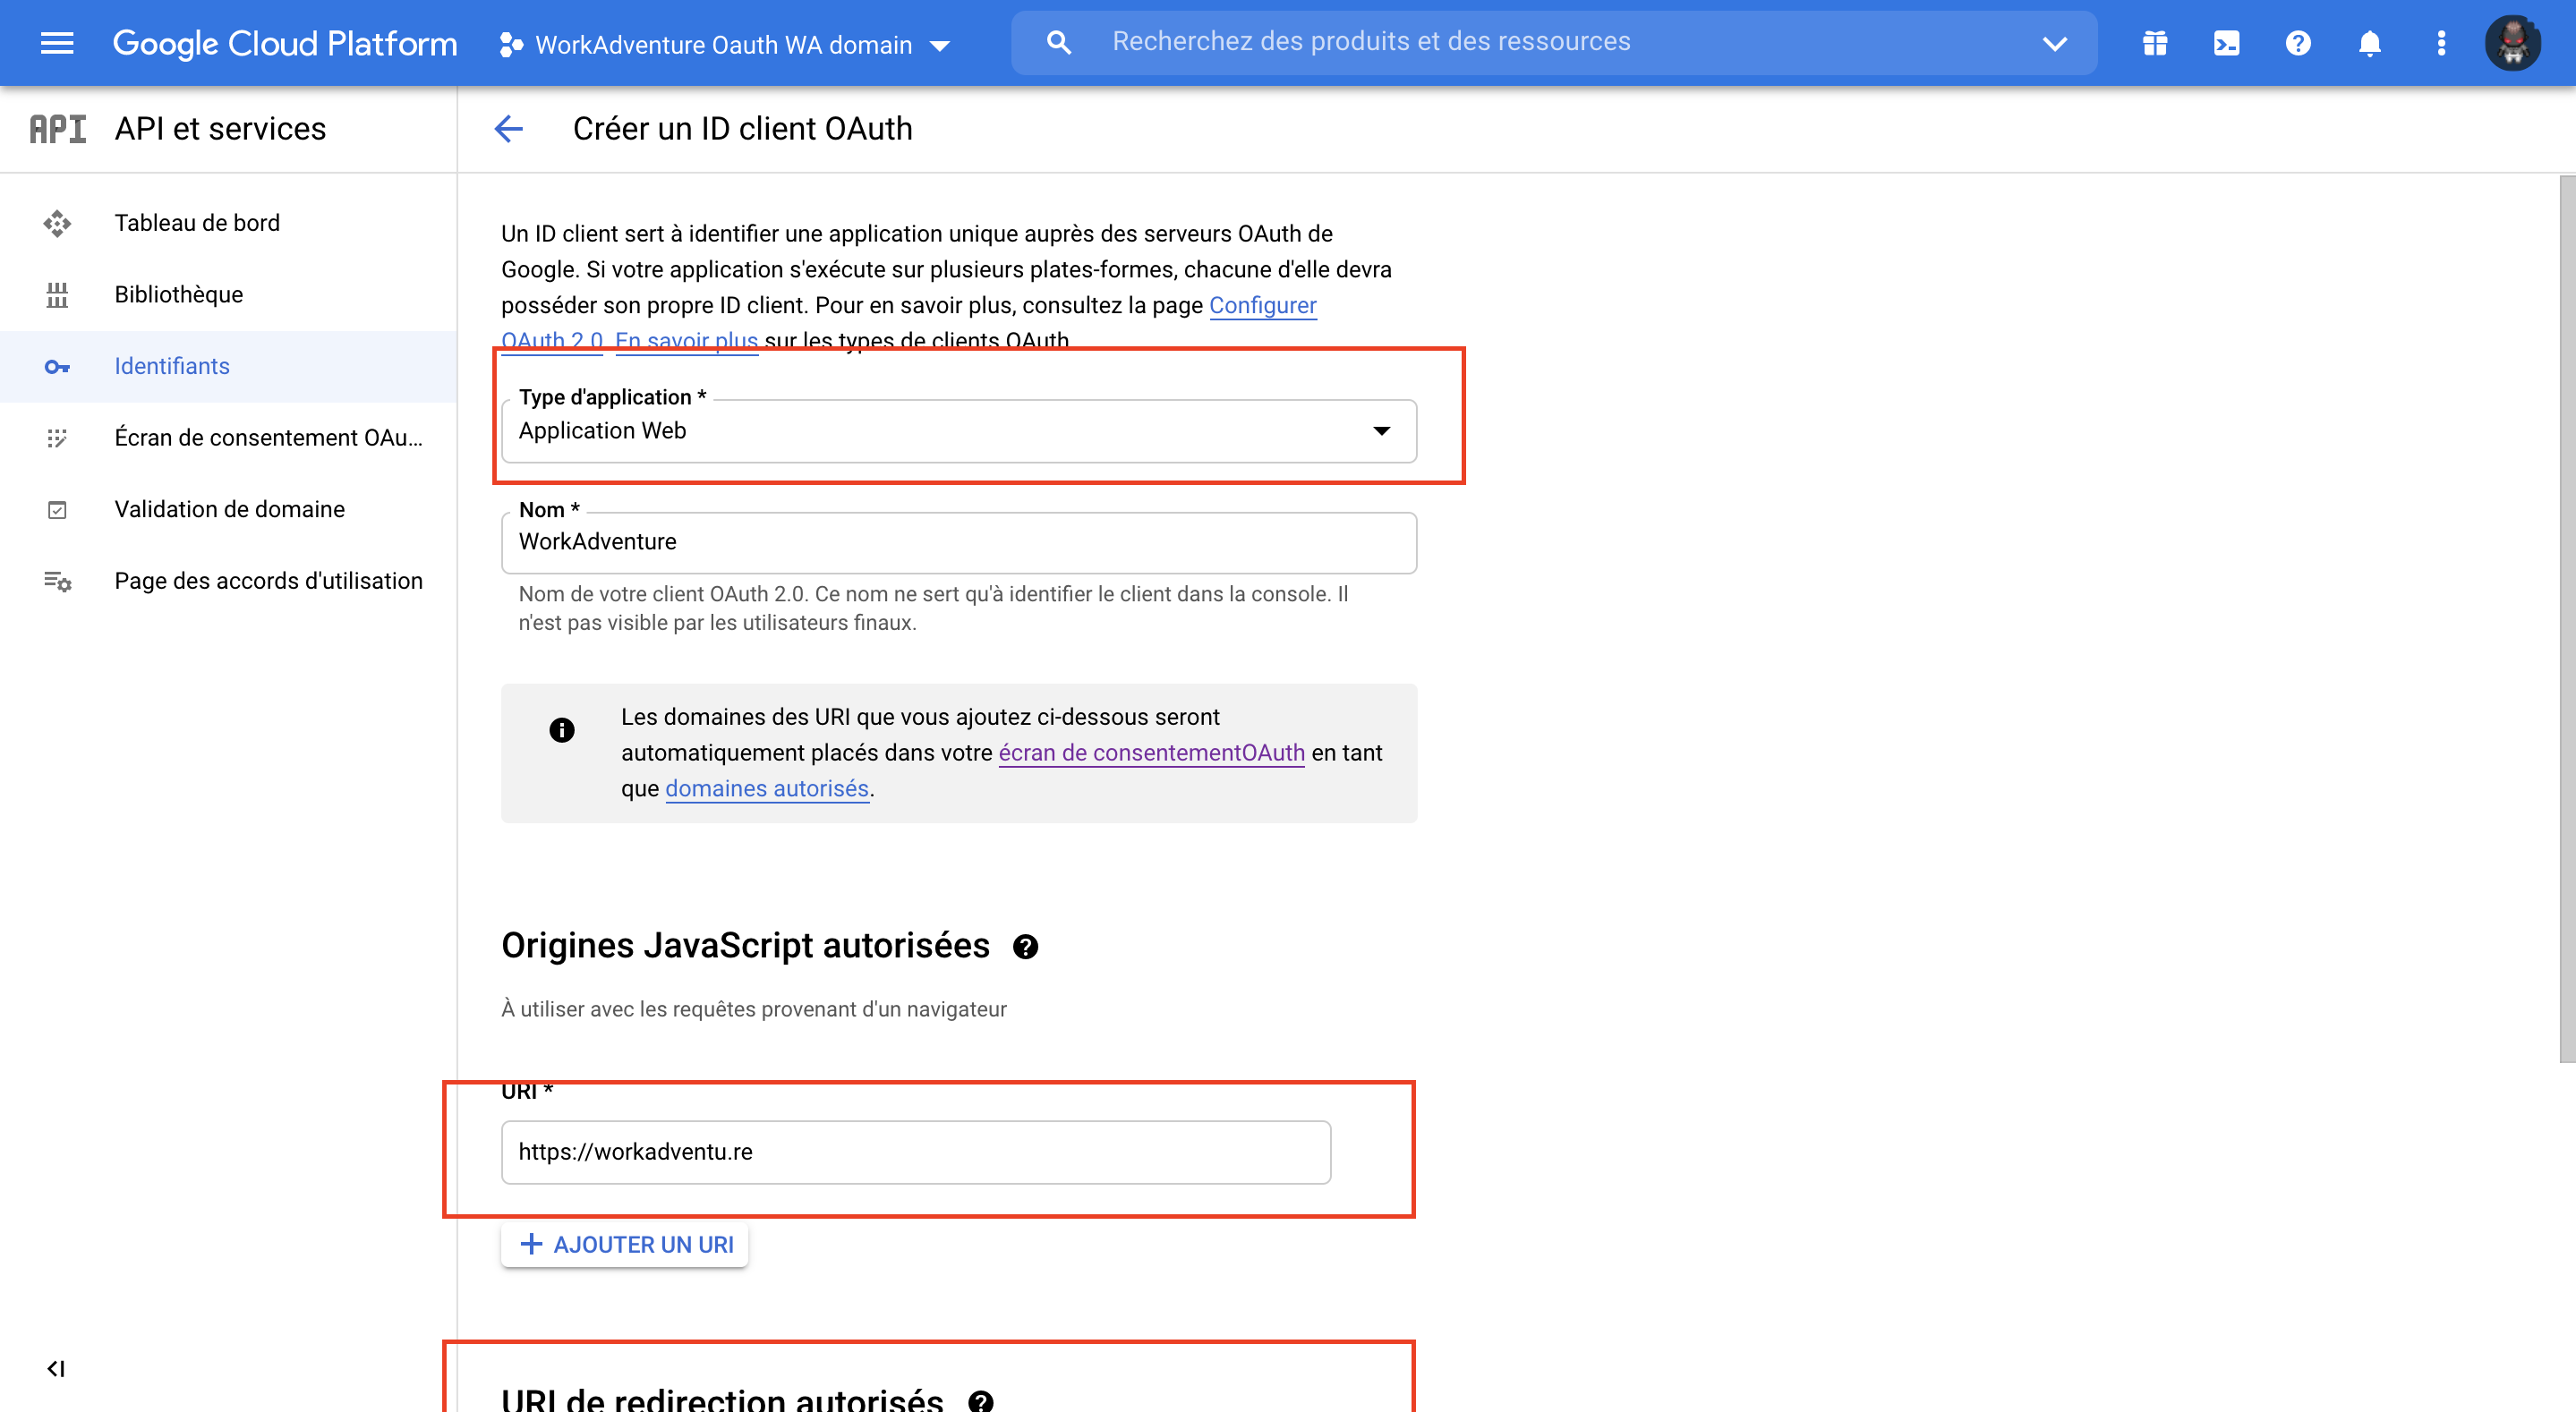
In the settings form, the WorkAdventure information are:
- Javascript authorize:
https://admin.workadventu.re - Redirect url authorize:
https://admin.workadventu.re
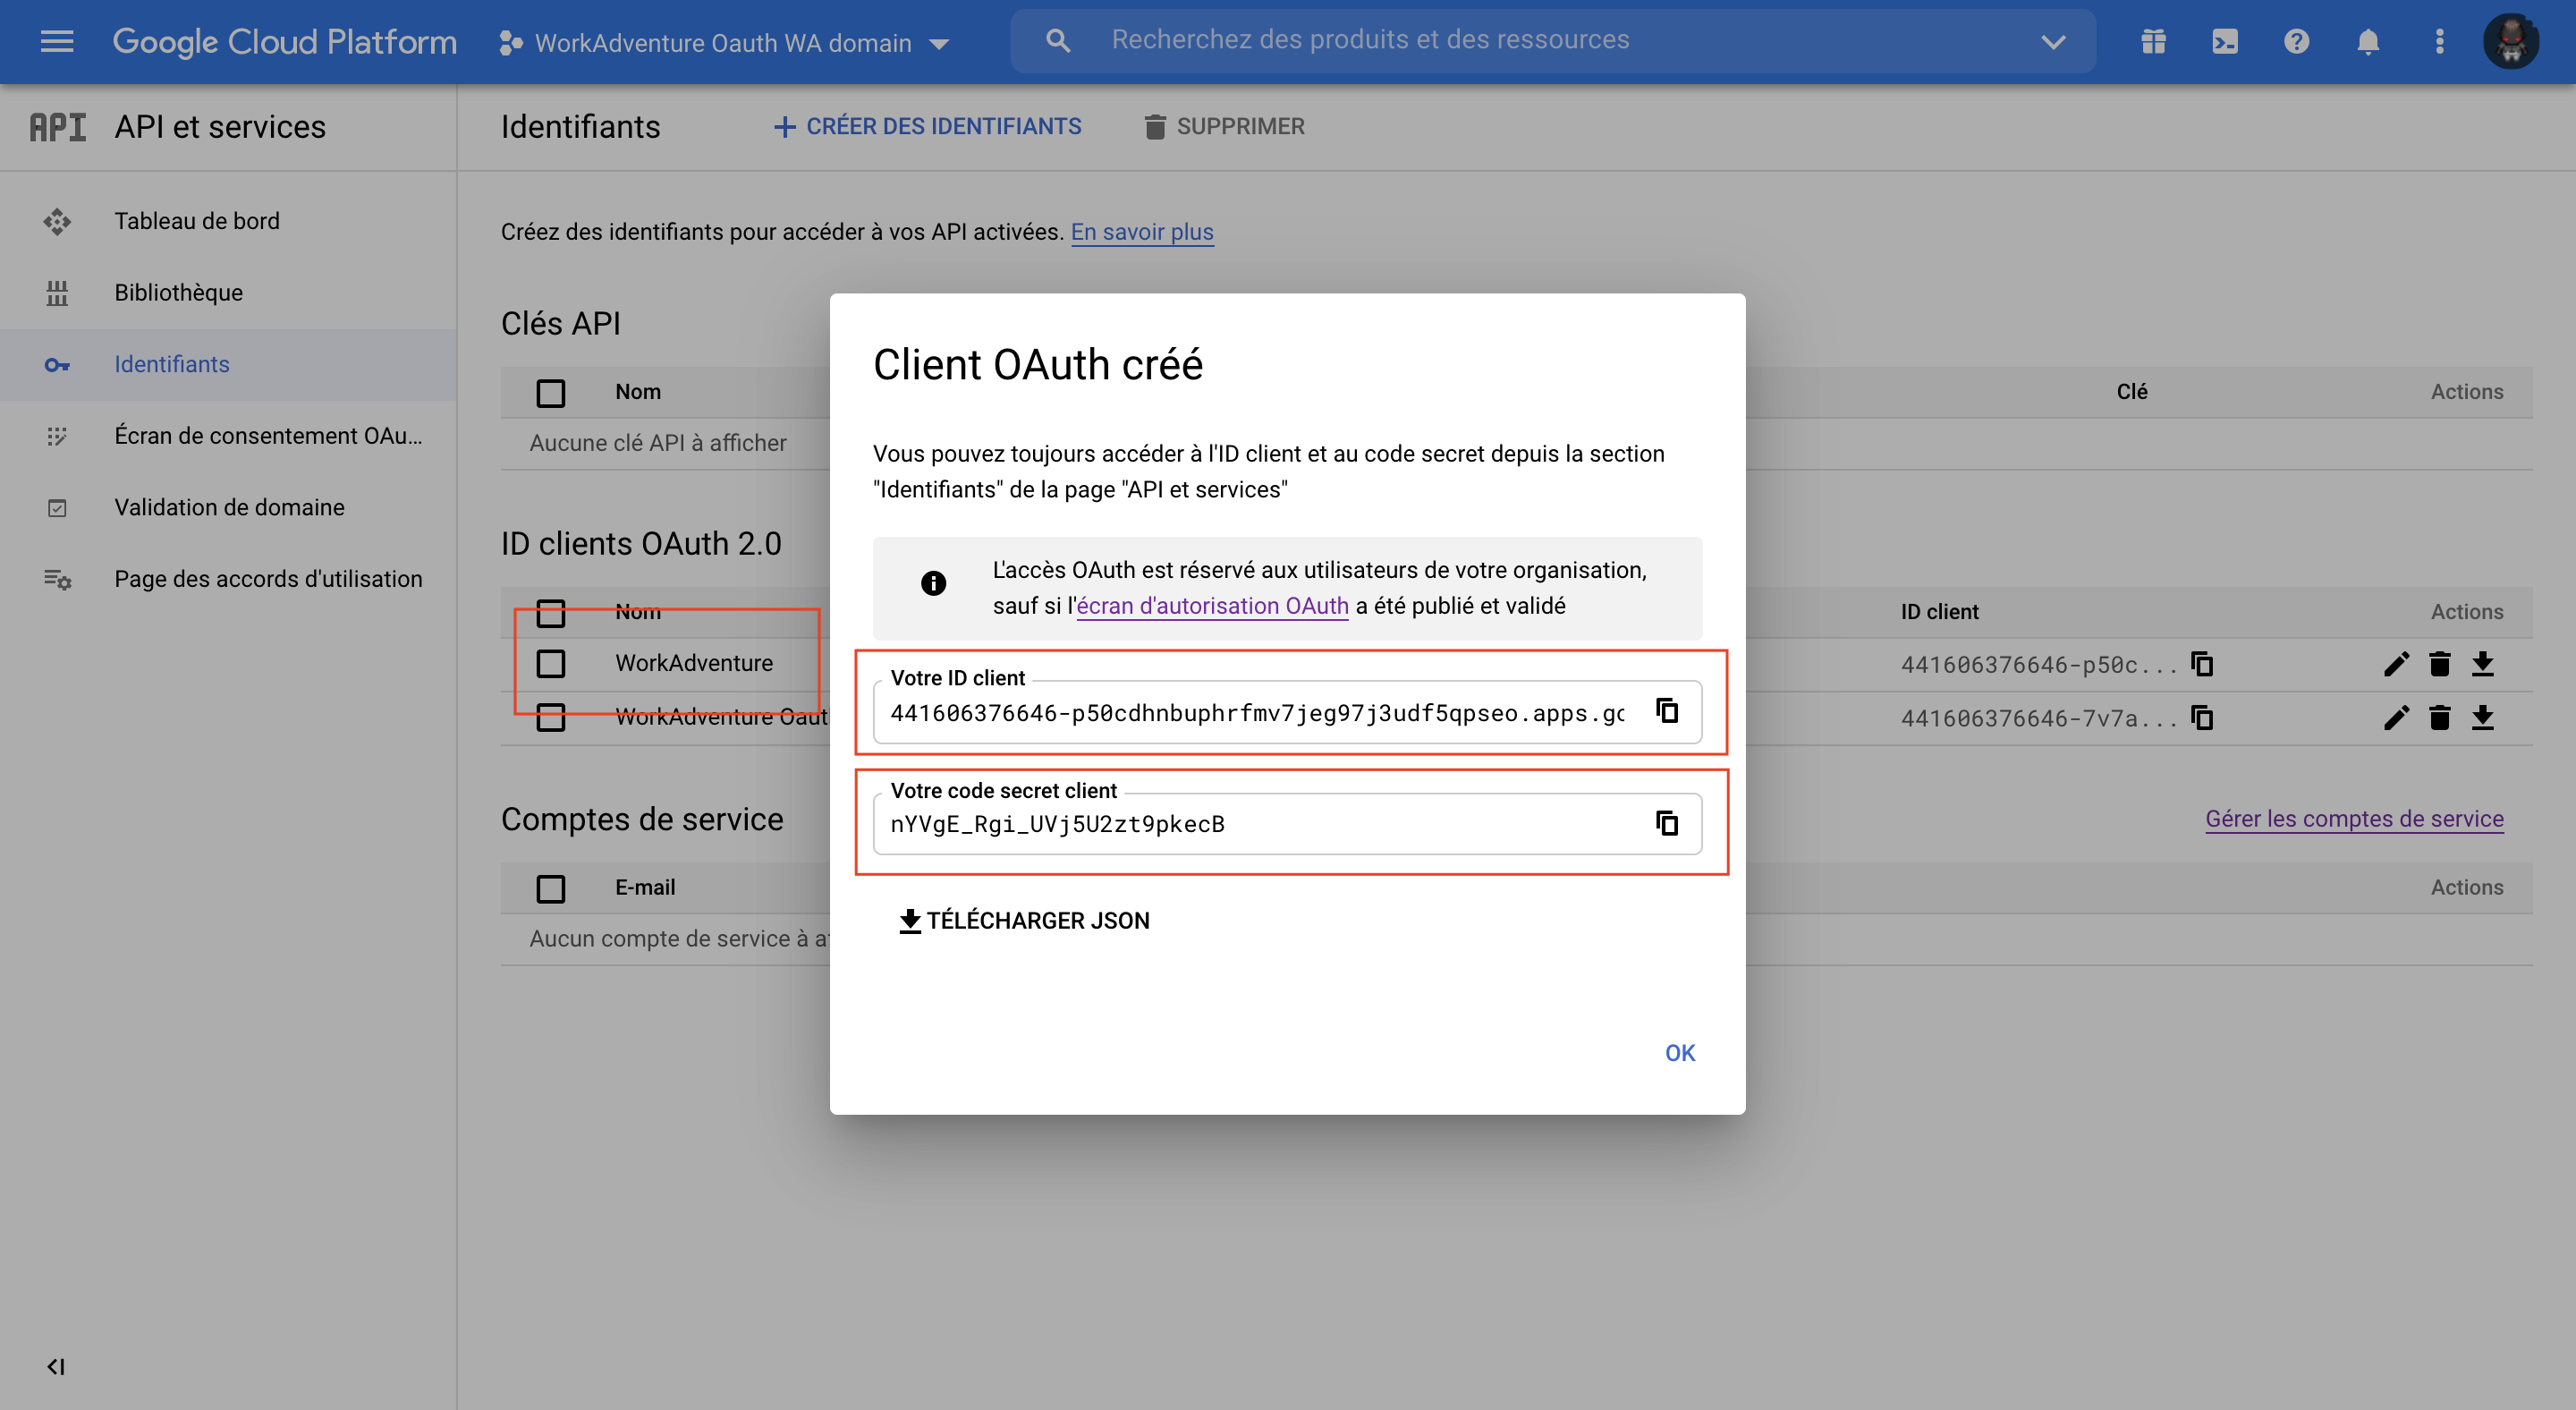
After this step, your Id and Secret will be generated.
The key generated is listed on your "Client ID Oauth2.0" dashboard.
Consent Google Oauth
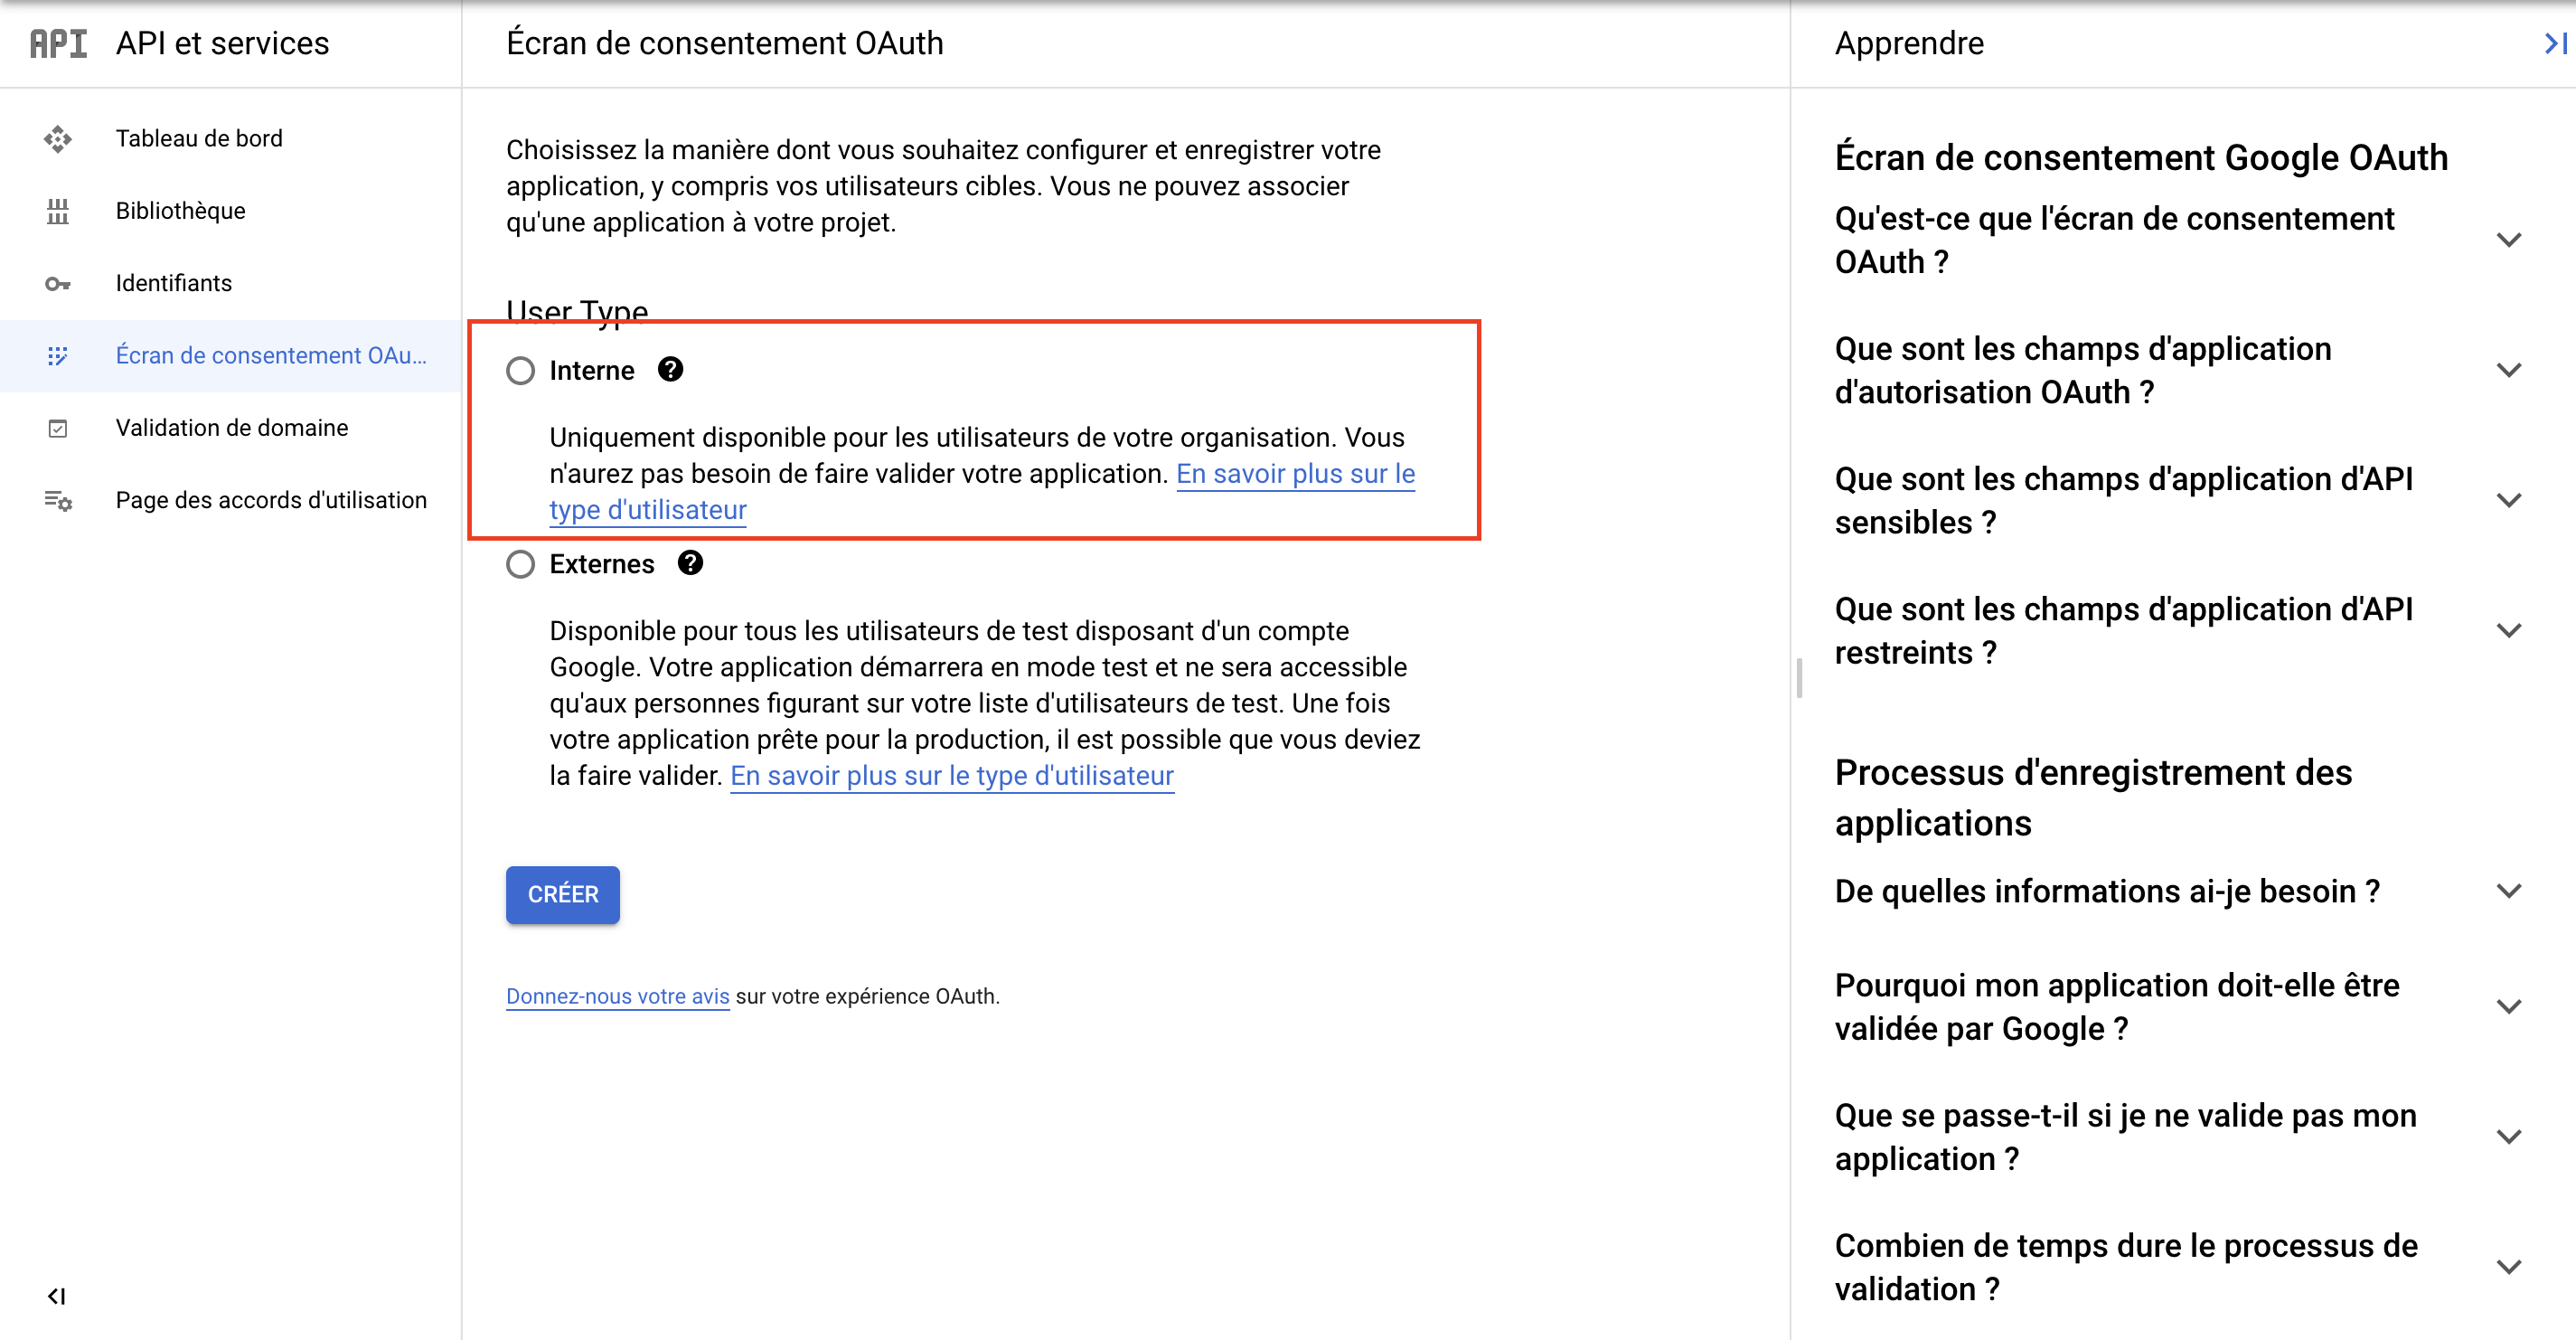
The second and last step is on the Oauth consent screen.
If not already specified, set "User Type" to allow access for all selected individuals. After that you can update or create consent page.
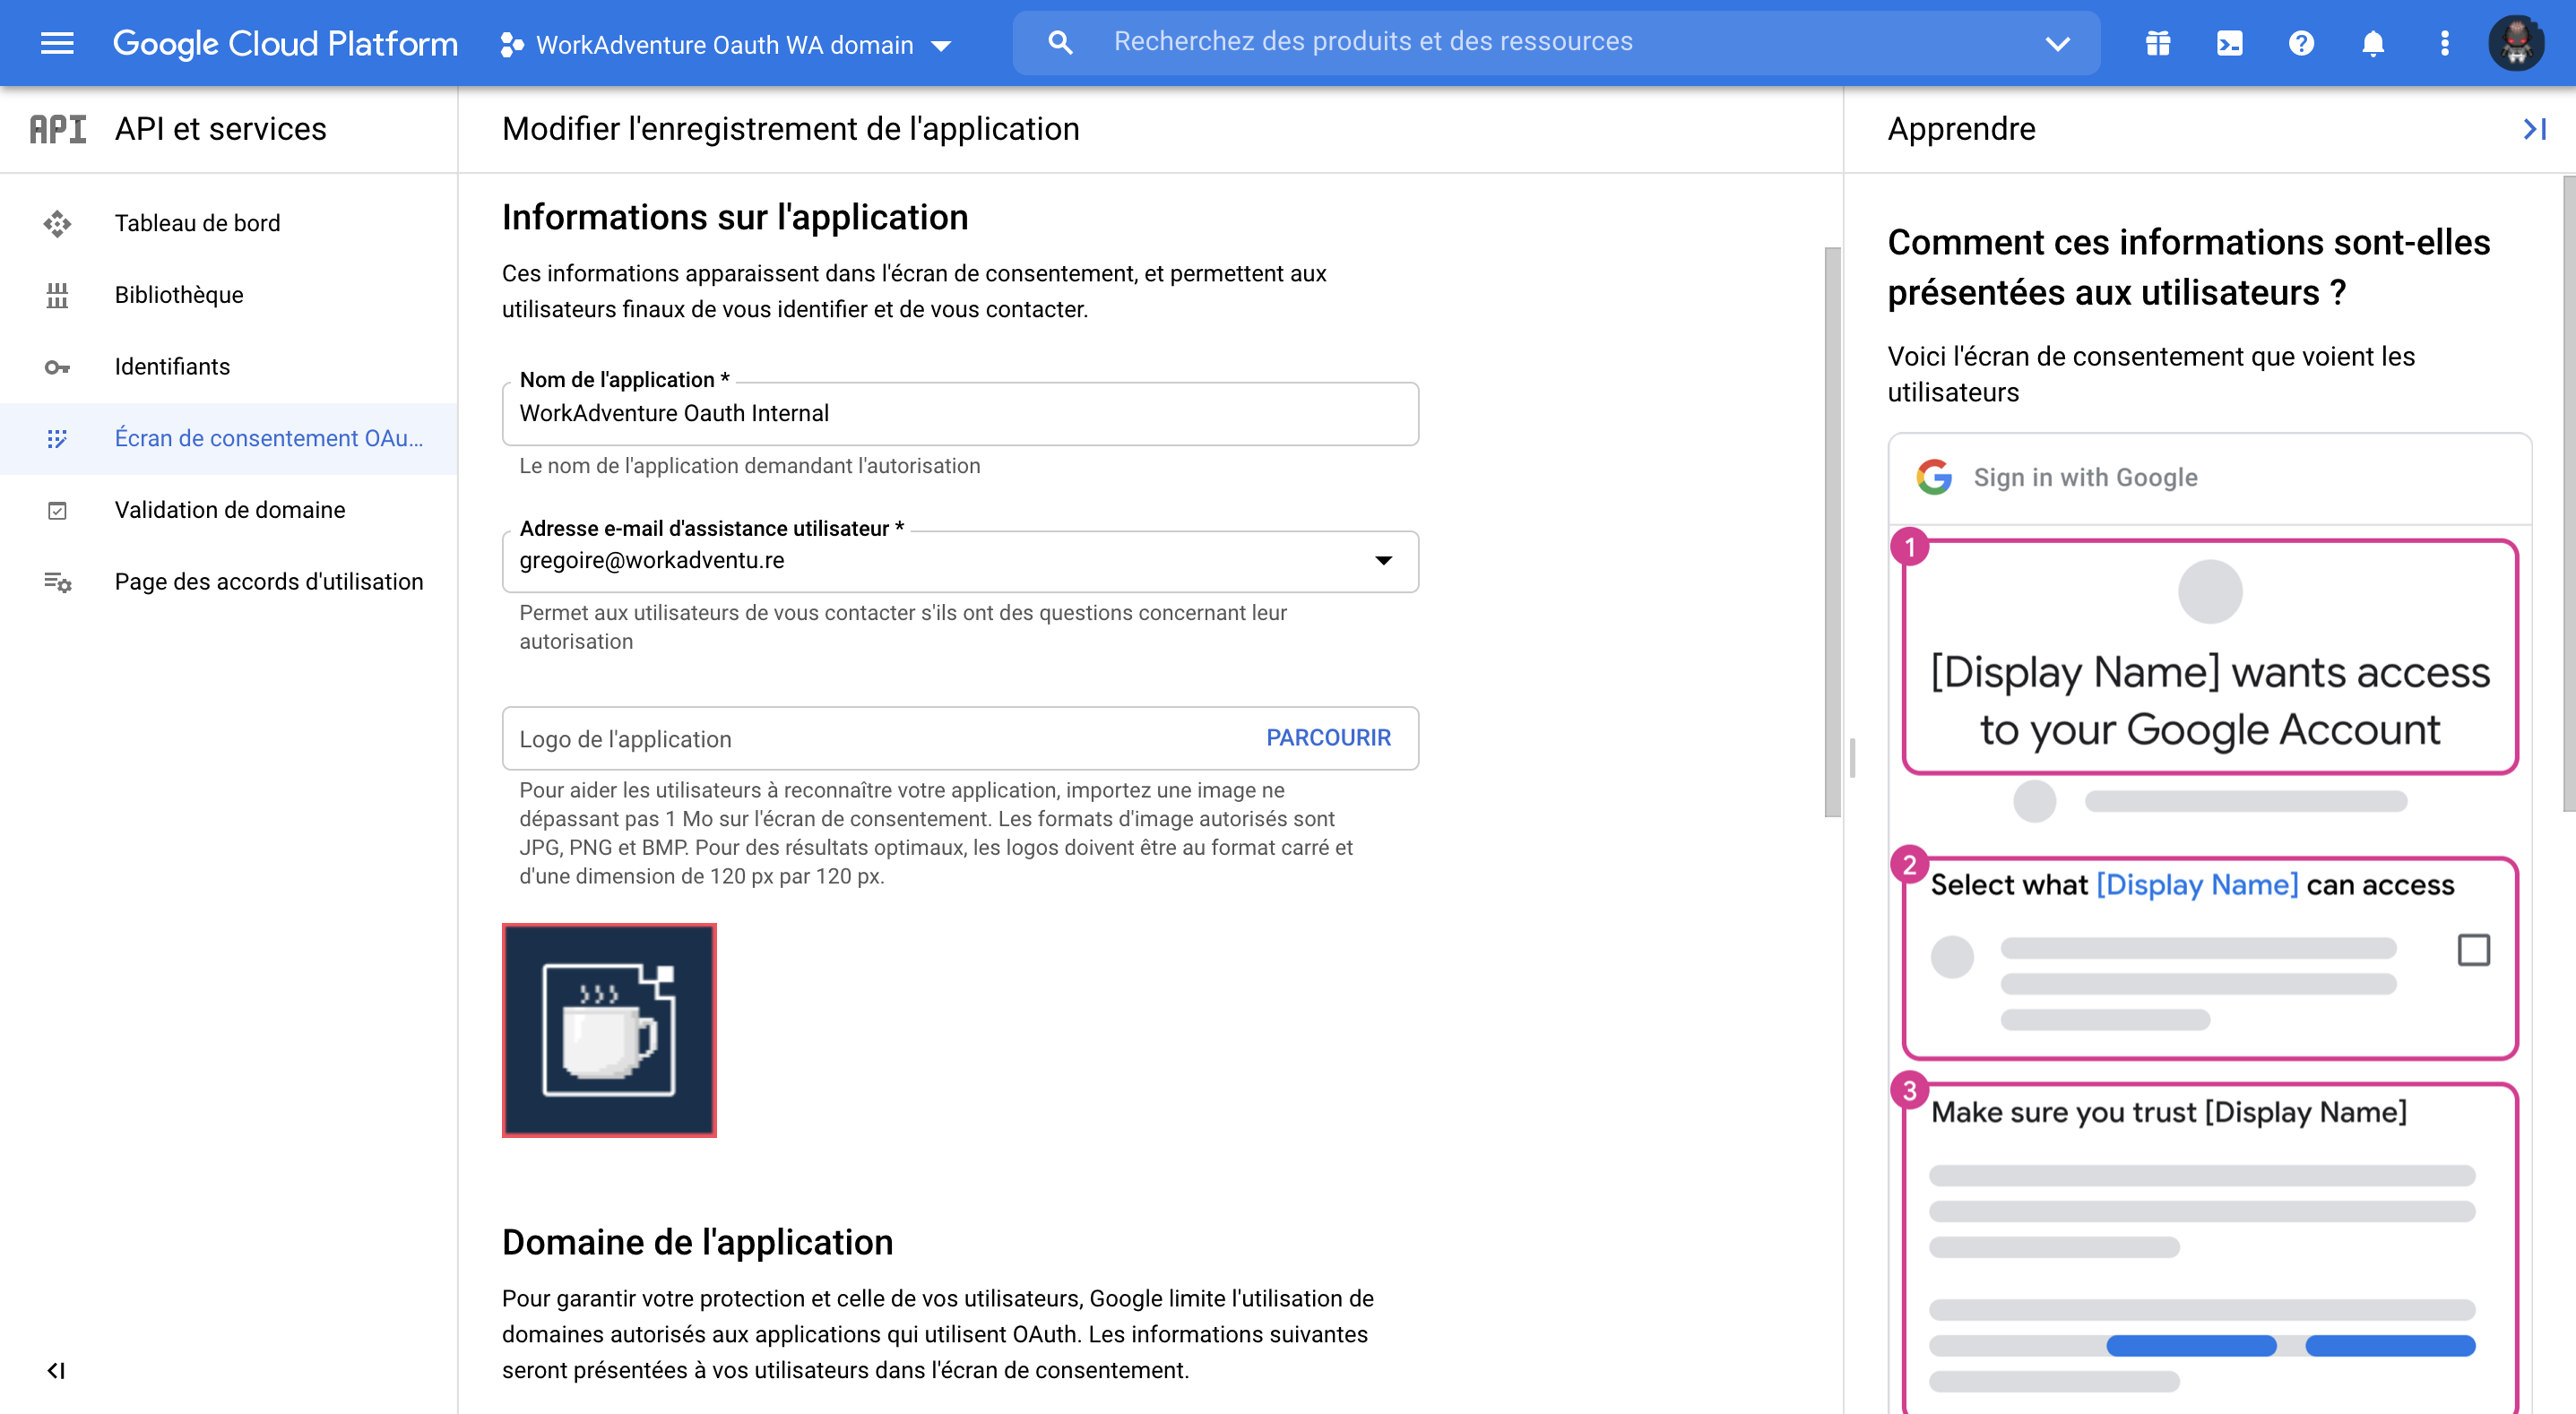
Required fields:
- Home page:
https://admin.workadventu.re - Privacy policy:
https://workadventu.re/privacy-policy - Terms of use:
https://workadventu.re/terms-of-use - Domain:
admin.workadventu.re
There are more details about you.
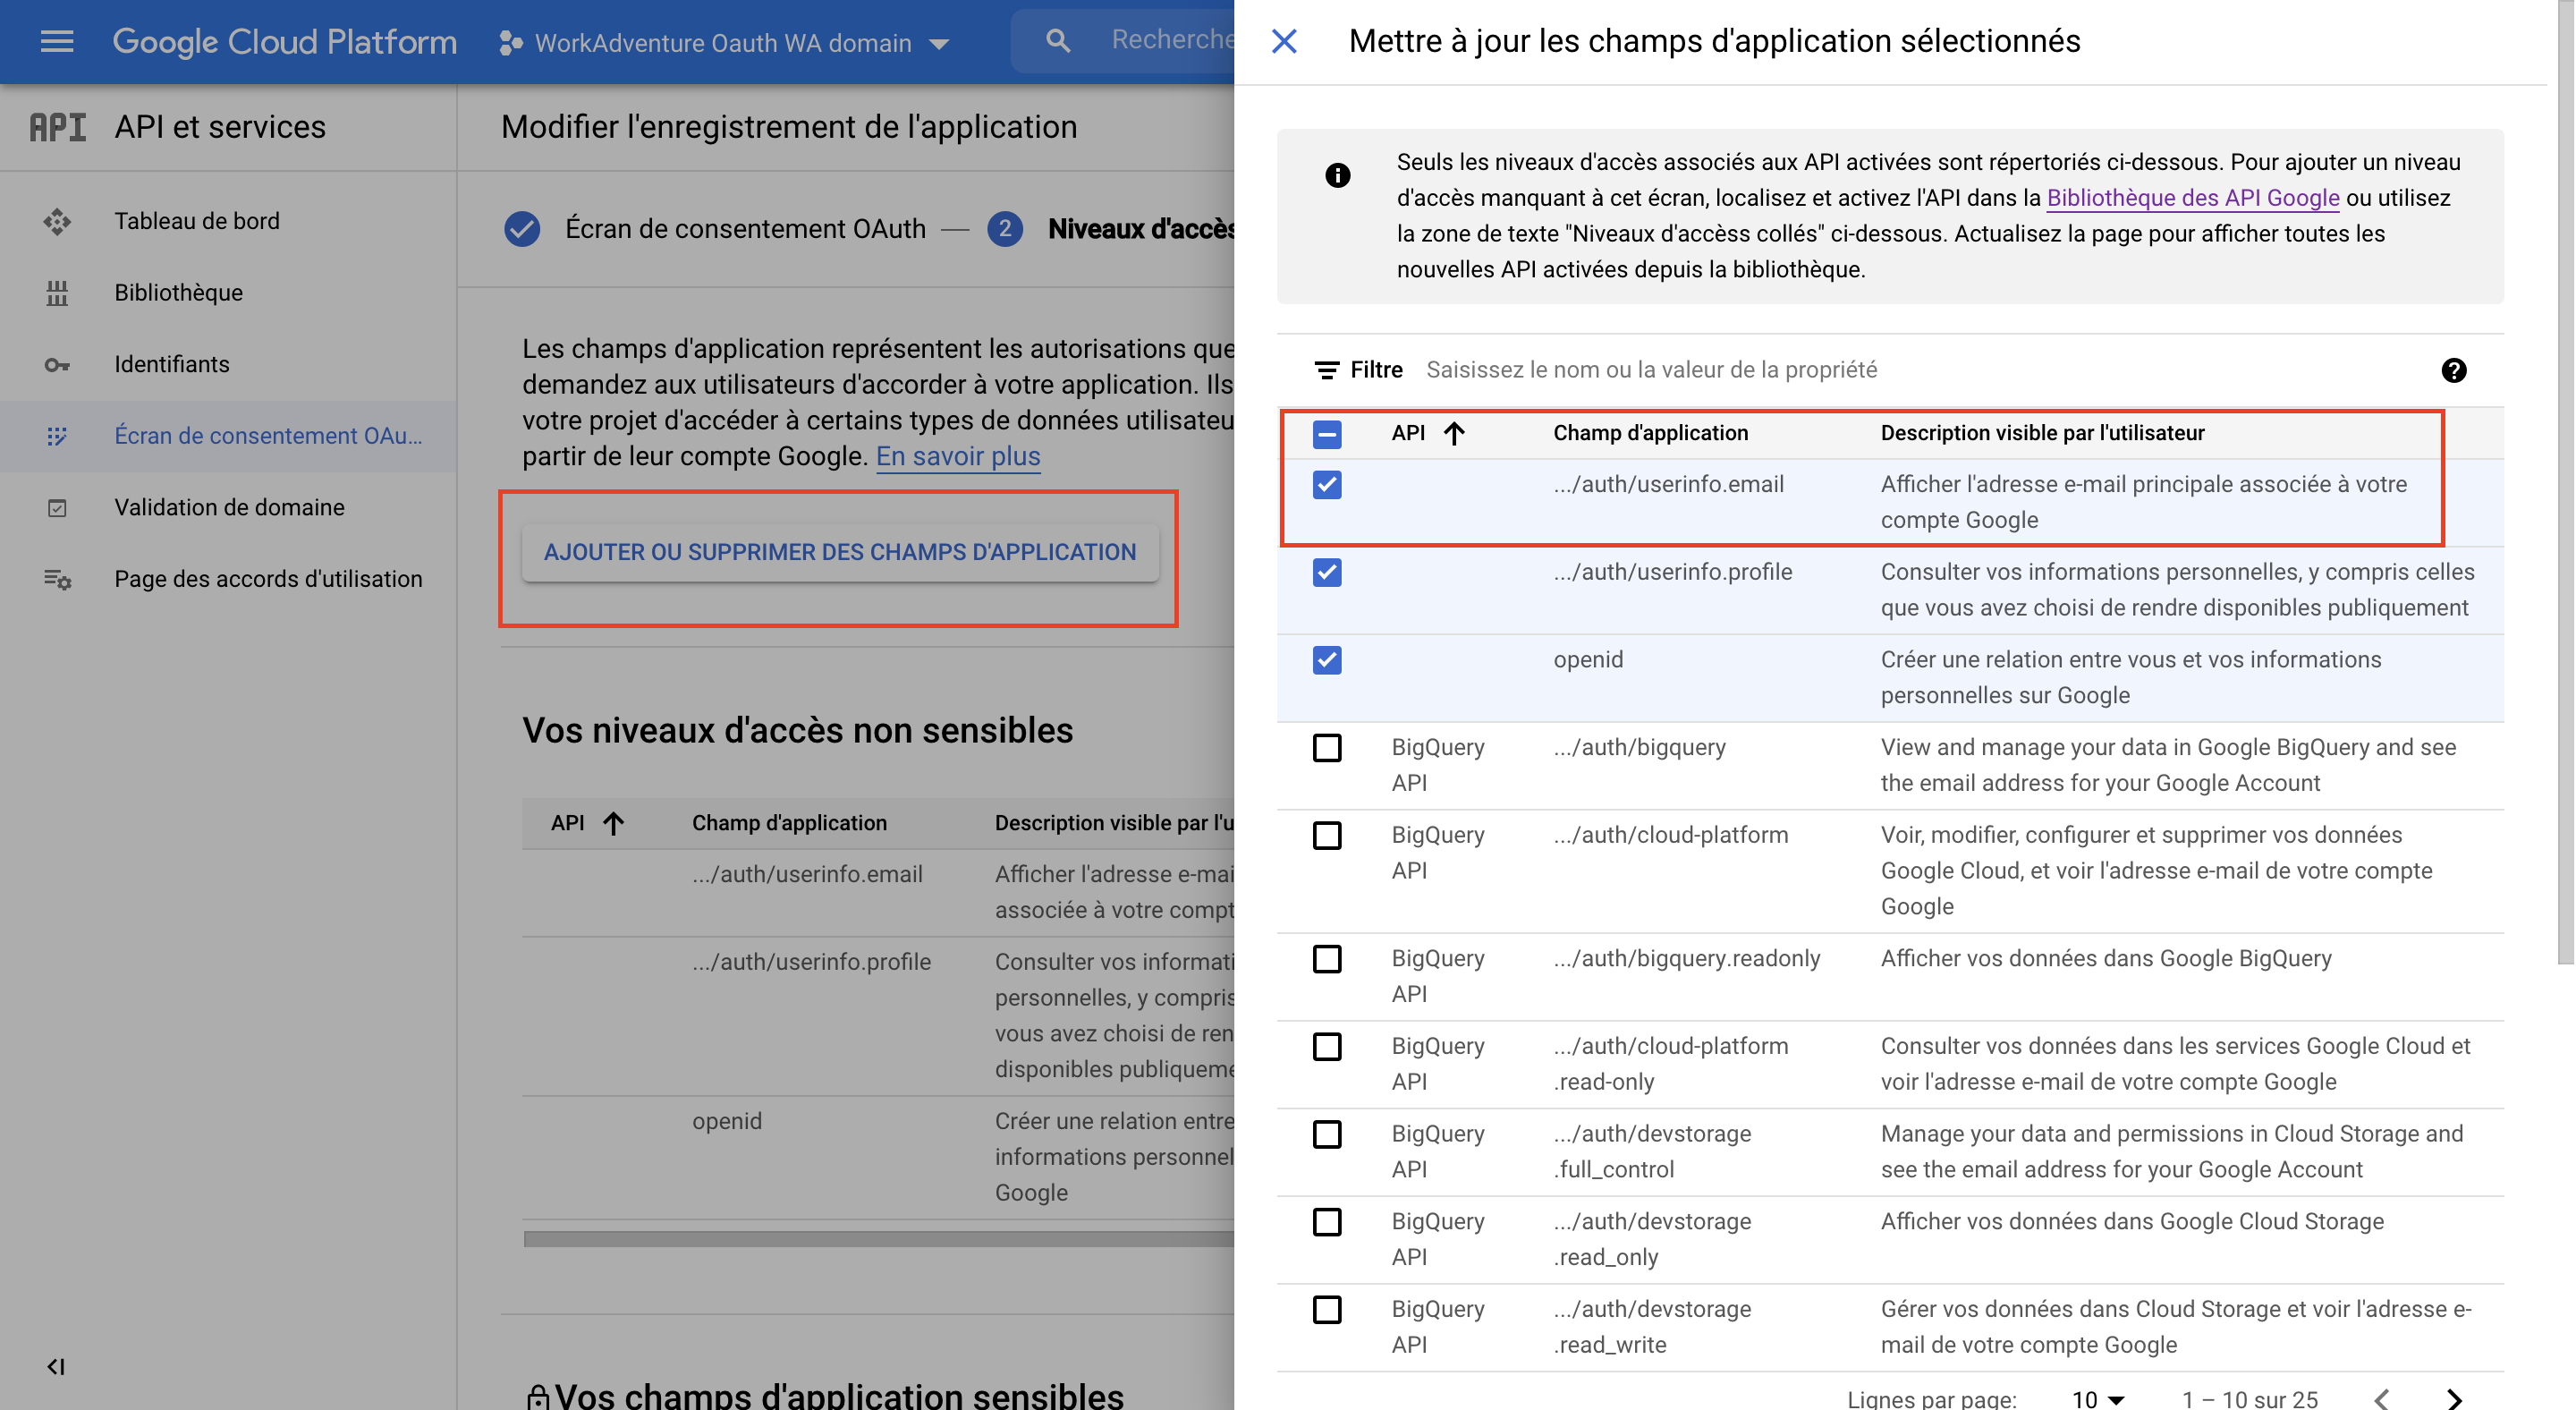
After that, you need to set the scope of your Google SSO provider, as well as set the level of access to the information we can request from your provider for the connected user.
As of this writing, WorkAdventure uses only the email address and the name of the user (you can force the user to use his/her name of OpenID in the world settings).
If all information has been validated, the next step should be confirmation.
If you have any questions, feel free to contact us.
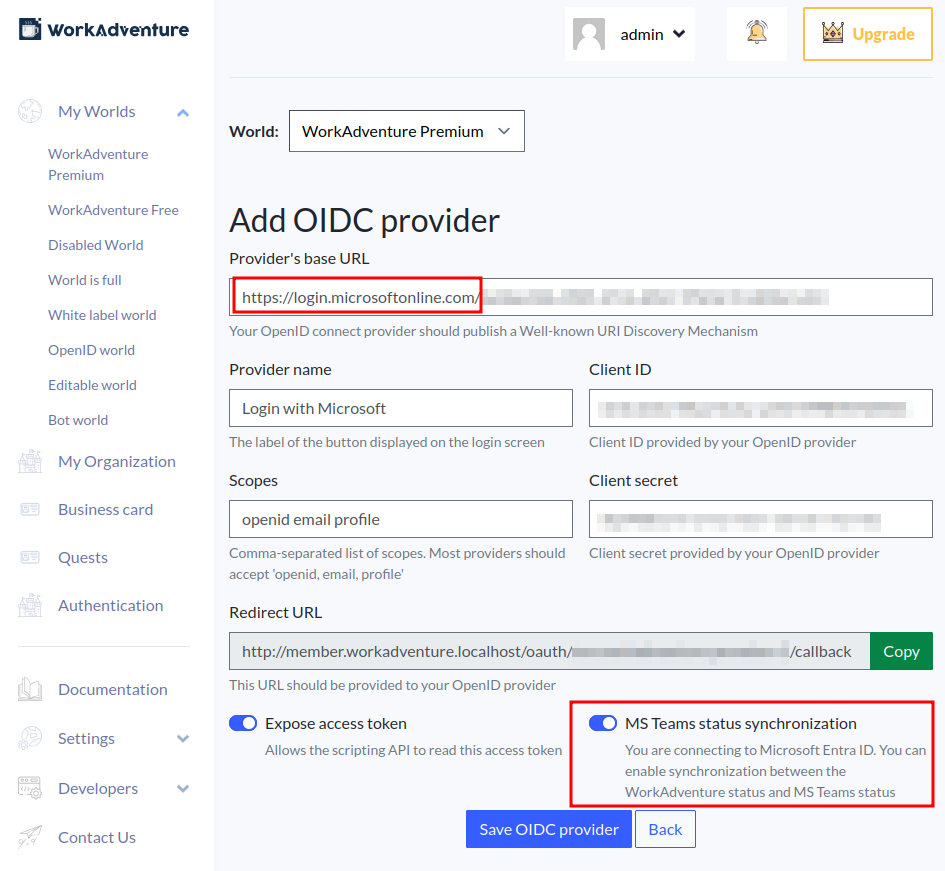
Example: Connecting to Microsoft Entra ID provider (formerly Azure Active Directory)
Create a New Application Registration
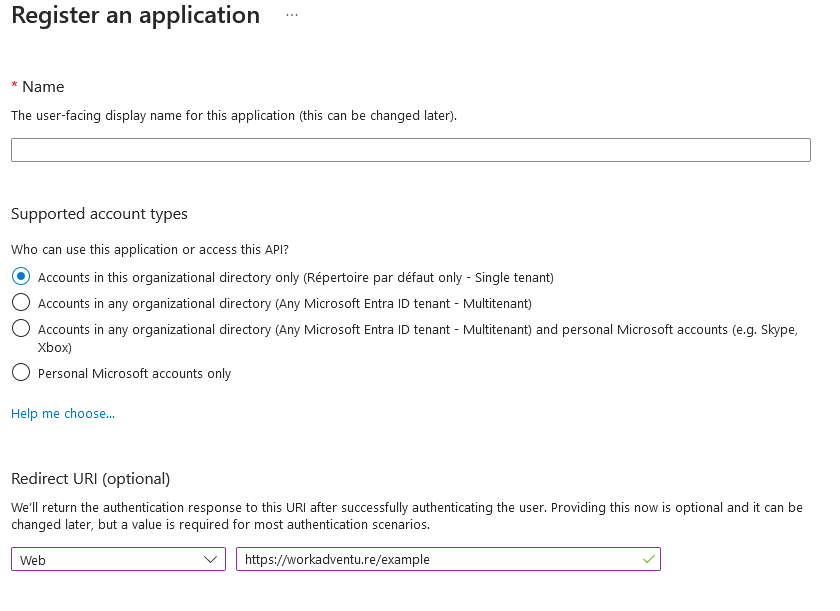
In the Entra ID dashboard, select "App registrations" under the "Manage" section. Click on the "+ New registration" button. Fill in the necessary details for your application: Name: Enter a name for your application. Supported account types: Choose whether the application will be used by accounts in your organizational directory only, or by accounts in any Entra ID directory. Redirect URI: This is the URI to which Entra ID will redirect after authentication. For WorkAdventure this URL is available on your admin dashboard on the . Click the "Register" button.
Configure Application Settings
After registering the application, you'll be taken to the application's overview page. Here, you can configure various settings:
- Application ID: This is also known as the Client ID. It's a unique identifier for your application.
- Directory (tenant) ID: This is the ID of your Entra ID tenant.
- Authentication settings: Configure how users sign in to your application, including supported account types and platform configurations.
Define API Permissions
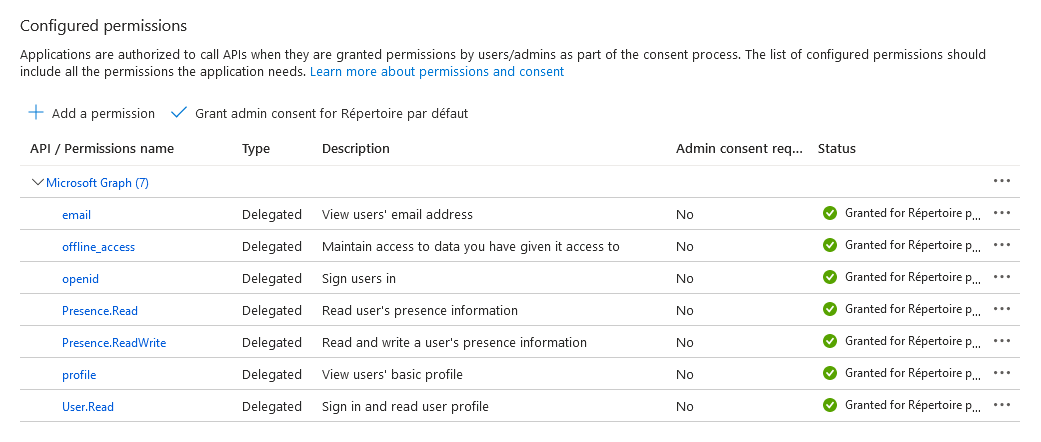
WorkAdventure needs different permissions according your usages, you'll need to define the required permissions:
In the application's overview page (in your Entra ID dashboard), click on "API permissions".
Click on the "+ Add a permission" button.
Select the API you want to access (Microsoft Graph). Choose the required permissions for your usages:
openid(required): Needed to allow the OpenID Connect authentication protocolemail(required): Needed to create a member account in WorkAdventurePresence Read/Write(optional) : This is required if you want to use the Microsoft Teams status synchronization feature
Configure Authentication
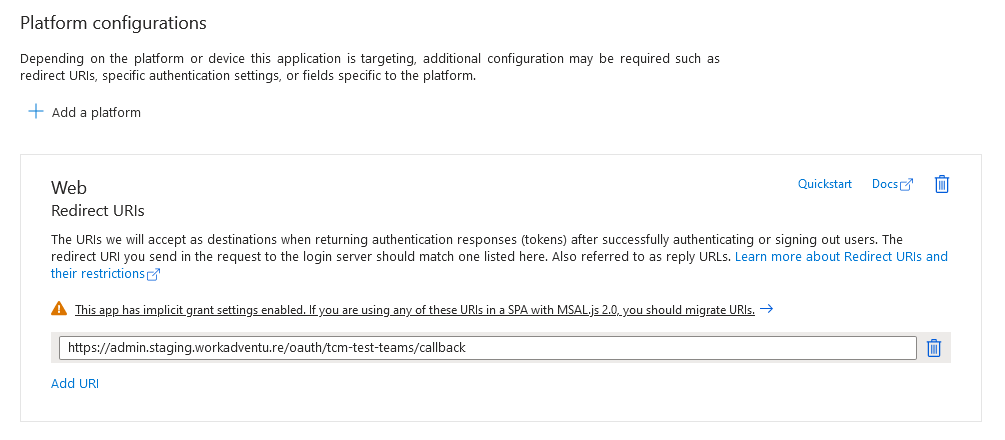
Under the application's settings, navigate to the "Authentication" section. Configure the authentication method for your application in your case it must be web, such as setting up a callback URL for redirect after login, these URL is available on your WorkAdventure admin dashboard at the OpenId section.
Obtain Application Secrets (Client Secrets)
In the application's settings, go to the "Certificates & secrets" section. Generate a new client secret (also known as an application secret). This secret is used for authentication between your application and Entra ID.
Verify Provider's base URL to get "openid-configuration" file
The openid-configuration file is a JSON document that contains metadata for authentication and authorization using OpenID Connect (OIDC). It helps client applications dynamically discover endpoints and configurations needed to authenticate users via Microsoft Entra ID (formerly Azure AD).
Why is this File Important?
This file provides applications with essential information, such as:
- The authorization URL to obtain an access token.
- The token endpoint URL to exchange an authorization code for a token.
- The revocation endpoint and other key details like supported signing algorithms.
Difference Between the Two URLs
| URL | Purpose |
|---|---|
https://login.microsoftonline.com/organizations/v2.0/.well-known/openid-configuration | Used for enterprise tenants (Azure AD Organizations). Only allows work and school accounts. Does not support personal Microsoft accounts (Outlook, Hotmail). |
https://login.microsoftonline.com/common/v2.0/.well-known/openid-configuration | Used for multi-tenant authentication. Accepts any Microsoft user, including personal accounts (Microsoft, Outlook, Xbox, etc.). |
So in the major of use case, the Provider's base URL use in WorkAdventure Authentication is: https://login.microsoftonline.com/organizations/v2.0/.well-known/openid-configuration.
Example JSON Response
Here’s an example response when accessing one of these URLs:
{
  "issuer": "https://login.microsoftonline.com/{tenant_id}/v2.0",
  "authorization_endpoint": "https://login.microsoftonline.com/{tenant_id}/oauth2/v2.0/authorize",
  "token_endpoint": "https://login.microsoftonline.com/{tenant_id}/oauth2/v2.0/token",
  "userinfo_endpoint": "https://graph.microsoft.com/oidc/userinfo",
  "jwks_uri": "https://login.microsoftonline.com/{tenant_id}/discovery/v2.0/keys",
  "response_types_supported": [
    "code", "id_token", "token"
  ],
  "subject_types_supported": ["pairwise"],
  "id_token_signing_alg_values_supported": ["RS256"],
  "scopes_supported": ["openid", "profile", "email"]
}
🔹 Use Cases
- If your application only needs enterprise authentication, use the organizations URL.
- If your application needs to support all Microsoft users (both personal and business), use the common URL. For tenant-specific authentication, use:
https://login.microsoftonline.com/{tenant_id}/v2.0/.well-known/openid-configuration
where {tenant_id} is your Azure tenant ID.
Microsoft Teams status synchronization
Once you have configured Entra ID as your OpenID Connect provider, you can enable the Microsoft Teams status synchronization feature.
When you are in a Microsoft Teams meeting or call, your status will be automatically updated to "busy" in WorkAdventure. And it also works the other way around: when you are in a WorkAdventure bubble or meeting, your status will be automatically updated to "busy" in Microsoft Teams.
This way, your colleagues will know when you are available or not, whatever the application you are using.
To enable this feature, you must first configure an OpenId Connect SSO on Microsoft Azure with the "Presence Read/Write" permission on your world.
This feature is only working with Microsoft Teams Work/School accounts.
Go on the "Developer / Oauth OpenId" section of the WorkAdventure dashboard.
Where you configured your Microsoft Azure OpenId Connect, a "Microsoft Configuration" section is available.
This section is only visible for domains started with "https://login.microsoftonline.com" for applications with a custom domain name please contact us to be able to configure this part.
You have just to check the "Microsoft Teams Status Synchronization" to enable the status synchronization on all maps of this world.
